You came here looking for Mt Fuji photo spots — not a hiking guide, not a hotel review. You want to know: where can I stand, at what time, with what lens, to capture that iconic snowy cone on a manageable day trip from Tokyo?
Here is the honest answer: Chureito Pagoda and the northern shore of Lake Kawaguchiko (Oishi Park) are your two best bets for postcard-style shots. If you want volcanic valleys and red torii gates as foreground, head to Hakone. And yes — you absolutely need to arrive before 9:00 AM, or the clouds will win.
- For a completely hassle-free photo day: Check availability for this highly-rated Mt Fuji & Hakone Day Tour (covers round-trip transport, ropeway, and lake cruise — you just bring your camera).
- For detailed reviews: Read our in-depth breakdown: Is This Mt. Fuji & Hakone Day Tour from Tokyo Really Worth It?
When to Go: Best Season & Time of Day for Mt Fuji Photos
Mt Fuji is famously camera-shy. Even when Tokyo has blue skies, the mountain can vanish behind haze just 100 km away. Setting expectations early will save you frustration.
- Best months: November to February. Cold, dry winter air gives you the clearest views and sharpest photos. Summer (June to August) is the worst — high humidity often keeps Fuji completely hidden.
- Best time of day: Before 9:00 AM. Clouds and haze build up as the ground warms. Your odds of a crisp, unobstructed shot drop sharply by mid-morning.
- The golden rule: No tour, no guide, no early start can guarantee a clear view. Always have a backup plan (onsen, museum, or a local cafe) so the day isn’t wasted if Fuji decides to hide.
Kawaguchiko vs Hakone: Which Base Is Right for You?
From Tokyo, you have two main zones for a Mt Fuji photo day trip. They offer completely different experiences, and choosing the right one depends on what kind of photos you want.
| Feature | Kawaguchiko (Fuji Five Lakes) | Hakone |
|---|---|---|
| Mt Fuji size in frame | Large & dominant — fills your frame | Distant — beautiful but smaller |
| Foreground options | Lakes, pagodas, seasonal flowers, rural village | Volcanic valley, red torii gate, pirate ship |
| Best lens | 24-70mm works fine; 70-200mm for compression | 70-200mm strongly recommended |
| Access from Tokyo | ~2 hrs by highway bus (¥2,200) or Fuji Excursion train (¥4,130) | ~1.5 hrs by Odakyu Romancecar to Hakone-Yumoto |
| Best for | Serious photographers wanting bold, iconic Fuji shots | Travelers wanting hot springs, shrines & varied landscapes |
Bonus: Can You See Mt Fuji from Tokyo?
Yes — on clear winter mornings, you can spot Fuji from observation decks like Shibuya Sky, Tokyo Skytree, or the Tokyo Metropolitan Government Building. But it will look small. Great as a background element, not a substitute for a dedicated photo trip.
7 Best Mt Fuji Photo Spots for a Day Trip from Tokyo
Below are the seven top spots, ordered from Kawaguchiko-area locations to Hakone. Each includes the best time to arrive, crowd level, and a quick note on accessibility.
Spot 1: Lake Kawaguchiko Shores & Oishi Park
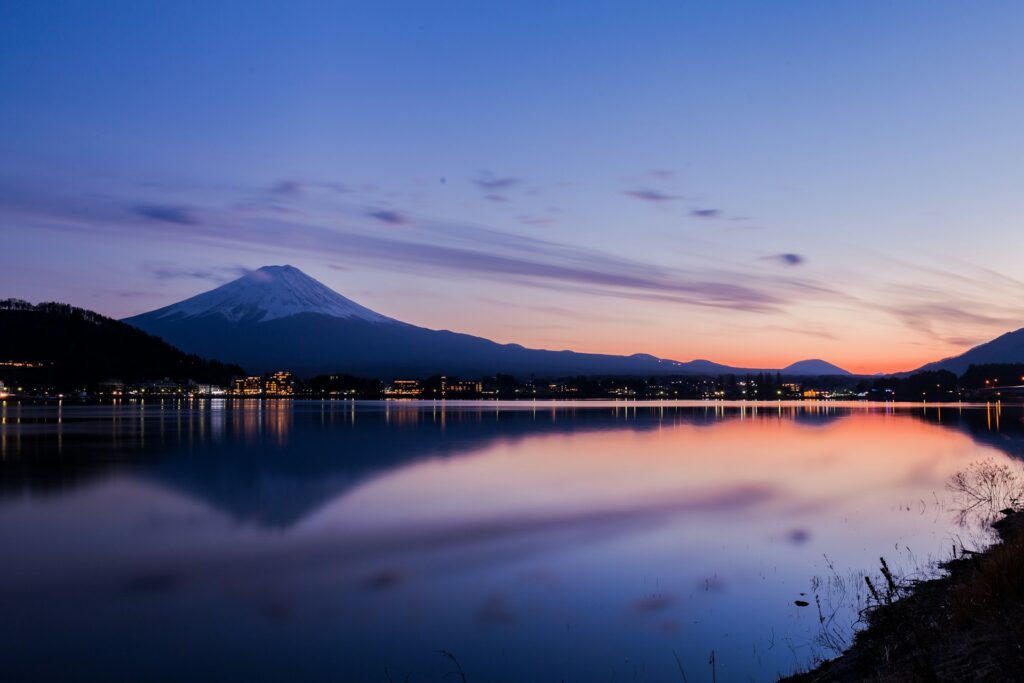
The northern shore of Lake Kawaguchiko is arguably the single best area for clear, unobstructed photos of Fuji rising directly over the water.
- Oishi Park (大石公園): Free entry, open 24/7. Famous for seasonal foregrounds — lavender in early summer, red kochia bushes in autumn, and cherry blossoms in spring. The wide-open sweep makes it ideal for wide-angle shots. 📍 Google Maps
- Kawaguchiko Ohashi Bridge area: Great for capturing Fuji with boats and the shoreline in the foreground.
- Best time to arrive: 6:30 AM – 8:00 AM for glassy lake reflections.
- Crowd level: Moderate in the morning; gets busy by 10 AM.
- Accessibility: Flat paved paths — stroller and wheelchair friendly.
- Pro tip: Rent an e-bike near Kawaguchiko Station to zip between photo spots along the northern shore without waiting for sightseeing buses.
- Smartphone tip: Use the ultra-wide lens (0.5x on iPhone / 0.6x on Android) to capture both the lake and the full height of Fuji. Tap to expose on the mountain, not the foreground.
Spot 2: Chureito Pagoda (Arakurayama Sengen Park)

This is the single most famous Mt Fuji photo spot in the world: a five-story red pagoda with the mountain towering perfectly behind it. You have seen it on postcards, Instagram, and every Japan travel blog — and it really does look like that.
- Access & cost: A 20-minute walk from Shimoyoshida Station (Fujikyu Railway). Entry to Arakurayama Sengen Park is free and open 24/7. 📍 Google Maps
- The catch: You must climb 398 stone steps to reach the main viewing deck. There is a gentler sloped path, but it is longer.
- Best time to arrive: 6:00 AM – 7:00 AM (sunrise). By 8 AM, the deck fills up quickly, especially during cherry blossom (early April) and autumn foliage (early November) seasons.
- Crowd level: Very high during peak seasons. Arrive at sunrise to secure a tripod spot.
- Accessibility: NOT stroller or wheelchair friendly due to the stairs. Consider skipping if you have mobility concerns.
- Pro tip: A medium telephoto lens (85mm–200mm equivalent) compresses the distance between the pagoda and Fuji, making the mountain look larger in frame.
- Smartphone tip: Use 2x–3x optical zoom if available. Digital zoom will reduce quality — get closer physically instead.
Spot 3: Oshino Hakkai (Thatched-Roof Village & Spring Ponds)
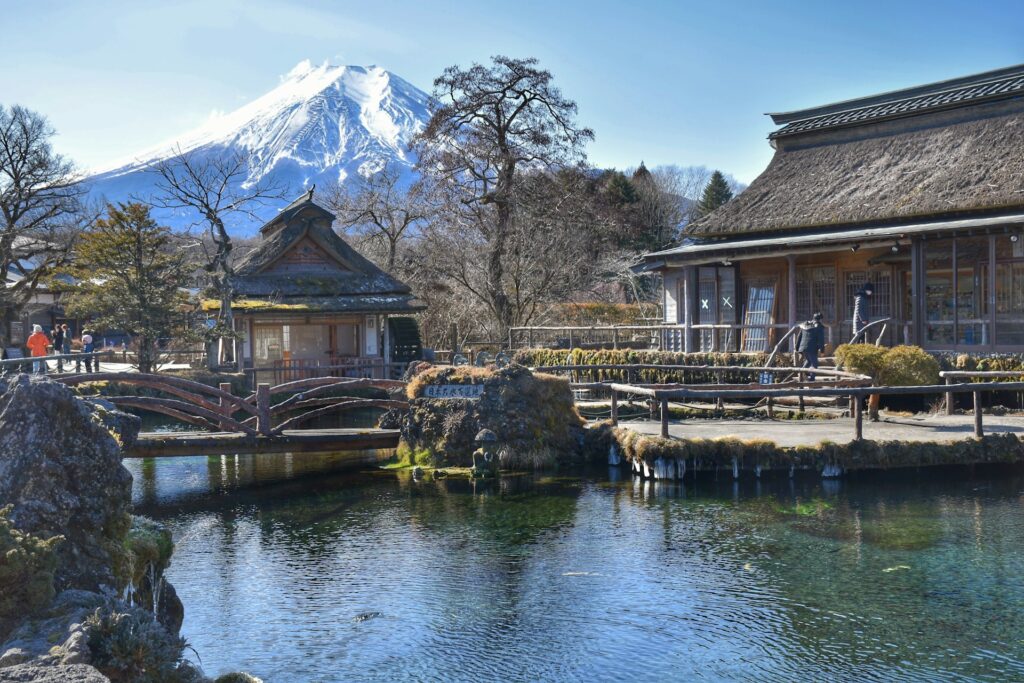
Oshino Hakkai is a preserved rural village famous for eight crystal-clear spring ponds fed by snowmelt from Mt Fuji. The atmosphere is completely different from the lakefront — quieter, more traditional, and excellent for reflection shots.
- The vibe: Historic and peaceful. The still ponds create perfect mirror reflections of Fuji. Entry is free.
- Best time to arrive: 8:00 AM – 9:00 AM (before the tour buses roll in).
- Crowd level: Moderate. Gets packed with tour groups by 10:30 AM.
- Accessibility: Mostly flat paths — stroller friendly, though some areas have gravel.
- Getting there: Take the Fujikko Bus from Kawaguchiko Station (about 25 minutes, runs every hour). Alternatively, it is a common stop on guided bus tours.
- Pro tip: For the best reflection shots, crouch low to the ground and keep your camera parallel to the water surface. A polarizing filter helps cut glare.
Spot 4: Honcho Street, Fujiyoshida (The Lawson & Shopping Street Shot)
This spot has exploded in popularity on social media — and for good reason. From the intersection near Lawson Fujiyoshida Town Hall, you can frame Mt Fuji towering above a row of traditional Japanese buildings (or the iconic blue Lawson sign).
- Access: A 10-minute walk from Fujisan Station (Fujikyu Railway). 📍 Google Maps (Lawson spot)
- Best time to arrive: 7:00 AM – 8:30 AM for the best light and fewer people.
- Crowd level: Very high since going viral. A black mesh barrier was installed at the Lawson location to manage pedestrian safety, but you can still get the shot from slightly different angles along the street.
- Accessibility: Flat, paved street — stroller and wheelchair friendly.
- Pro tip: Walk a bit further up the street away from Lawson to capture the traditional buildings without the convenience store sign, if that is more your style.
- Smartphone tip: Portrait mode (2x–3x zoom) works well here to separate Fuji from the foreground buildings.
Spot 5: Hakone Ropeway & Owakudani Valley
The Hakone Ropeway gives you a moving aerial perspective — volcanic steam vents in the foreground, Lake Ashi below, and Mt Fuji on the horizon. On a clear morning, this is one of the most dramatic photo sequences you can capture in a single ride.
- The experience: The ropeway runs between Sounzan, Owakudani, and Togendai. At Owakudani, you can eat the famous black eggs (boiled in the hot springs) while framing Fuji over the steaming volcanic landscape.
- Best time to arrive: 9:00 AM – 10:00 AM (first rides, before the midday haze).
- Crowd level: Moderate. The ropeway cabins seat 8–10 people — try to get a cabin with space to move to the Fuji-facing window.
- Accessibility: Wheelchair accessible at most stations, but Owakudani has uneven volcanic terrain.
- Important limitation: The ropeway typically operates from 9:00 AM to around 5:00 PM, but times vary by season. It can shut down suddenly due to high winds or elevated volcanic gas levels. Always check live operations on the official website before heading out.
- Pro tip: Stand by the windows on the Fuji-facing side (your guide or the station staff can tell you which side — it depends on the direction of travel). The angle shifts quickly as the cabin moves, so shoot continuously.
- Smartphone tip: Turn on burst mode and shoot a sequence as the cabin glides — pick the best frame afterward. A phone with a good telephoto lens (3x or 5x) will give you better results here than an ultra-wide.
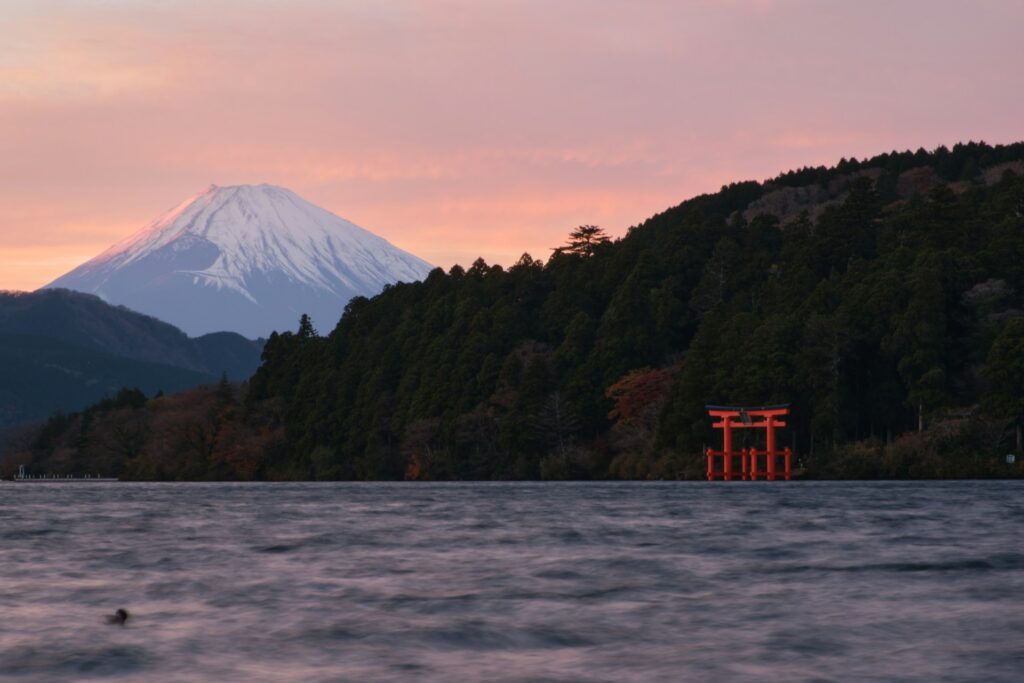
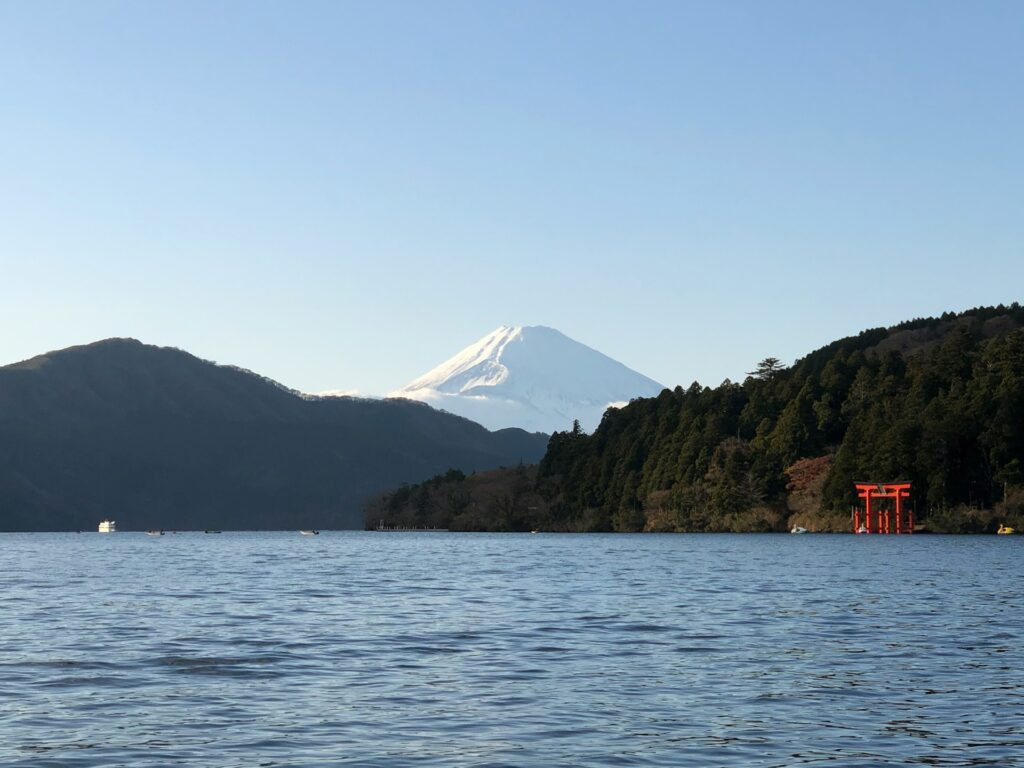
Spot 6: Hakone Shrine Torii Gate & Lake Ashi Cruise
The iconic red torii gate of Hakone Shrine, standing waist-deep in Lake Ashi with Mt Fuji behind it — this is the classic Hakone postcard composition.
- How to get the shot: You can photograph from the shore near Hakone Shrine (arrive early to avoid the crowds around the floating torii), or from the deck of the Hakone Sightseeing Cruise (the “pirate ship”) that crosses Lake Ashi between Hakonemachi and Togendai.
- Best time to arrive: 8:30 AM – 9:30 AM for the shrine. The pirate ships start running around 9:30 AM.
- Crowd level: High. The torii gate photo spot often has a queue of 20–30 people by 10 AM.
- Accessibility: The shrine approach has some stairs, but the torii gate area is relatively flat.
- Pro tip: From Hakone, Mt Fuji looks significantly smaller than from Kawaguchiko. A telephoto lens (70mm–200mm equivalent) is almost essential to compress the perspective and make the mountain look larger behind the torii gate.
- Smartphone tip: If your phone has a 3x telephoto lens, this is the time to use it. Without telephoto, focus on a wider composition that includes the lake, the torii, and the sky — Fuji will be a beautiful but smaller detail.
- Cost: Hakone Sightseeing Cruise one-way ticket is approximately ¥1,700 (included in the Hakone Freepass).
Spot 7: Bonus — Mt Fuji from Tokyo Observation Decks
On extremely clear winter mornings, you can spot Mt Fuji from Tokyo’s high observation decks. It will look small — think of it as a bonus background element, not a primary photo destination.
- Best decks: Shibuya Sky, Tokyo Skytree, and the free Tokyo Metropolitan Government Building.
- Best time: Sunrise to 8:00 AM in December–February.
- Pro tip: Bring the longest lens you have. Even 200mm will make Fuji look modest from 100 km away.
- When to skip: Any season other than winter, or any afternoon — the haze will completely hide the mountain.
Smartphone Photography Tips for Mt Fuji
Not everyone carries a DSLR. The good news: modern smartphones can capture excellent Mt Fuji shots if you follow a few rules.
- Use optical zoom, not digital zoom. Digital zoom crops the image and lowers quality. If you need to get closer, walk or use a 2x–5x optical zoom lens if your phone has one.
- Tap to expose on the mountain. If you tap on the sky, Fuji will look too dark. Tap directly on the snow cap to set exposure, then slightly pull down the brightness slider if the sky blows out.
- Shoot in Pro/RAW mode if available. This gives you more flexibility to recover shadows and highlights when editing later.
- Use burst mode on the ropeway. The angle changes every second — shoot a burst and pick the best frame later.
- Wipe your lens. Condensation from cold mornings or humidity can fog your phone lens. Give it a quick wipe before each shot.
- Wide-angle for landscapes, telephoto for compression. Use 0.5x for Oishi Park to capture the full lake and mountain. Use 2x–3x for Chureito Pagoda to make Fuji look larger behind the pagoda.
Rainy Day Backup Plan: What to Do When Fuji Hides
Let’s be honest: there is a real chance Mt Fuji will be completely covered by clouds on the day you visit. Do not let it ruin your trip. Here is what to do instead.
- In Kawaguchiko: Visit the Kawaguchiko Music Forest Museum (a whimsical European-style garden with automatic musical instruments), or the Itchiku Kubota Art Museum (stunning kimono art). Both are indoor-friendly.
- In Fujiyoshida: Head to Fuji Q Highland for amusement park rides (most operate in light rain), or visit the Fujisan World Heritage Centre for an excellent museum about the mountain’s cultural significance.
- In Hakone: Spend the day at a hot spring (onsen) — many ryokan offer day-use onsen baths. Hakone Yuryo and Tenzan Onsen are popular choices. The Hakone Open-Air Museum features impressive sculptures and a foot bath with mountain views (if the clouds lift).
- General rule: If the morning is completely overcast, adjust your expectations early. Pick one indoor activity as your main plan, and treat any Fuji sighting as a bonus.
How to Get There: DIY vs Guided Tour
There is no single “best” way to see Mt Fuji — your choice depends on your budget, schedule, and patience for navigating Japanese public transport.
DIY Day Trip: Transport Options & Costs
If you want full control over your schedule (essential for sunrise shoots), a DIY trip is doable.
| Option | Route | One-Way Cost | Notes |
|---|---|---|---|
| Highway Bus | Shinjuku → Kawaguchiko | ~¥2,200 | ~1 hr 45 min. Reserve online in advance. Heavy traffic on weekends. |
| Fuji Excursion Train | Shinjuku → Kawaguchiko | ~¥4,130 | Reserved seats. Sells out days in advance during peak seasons. |
| Odakyu Romancecar | Shinjuku → Hakone-Yumoto | ~¥1,500 (one way) | ~1.5 hrs. Combine with Hakone Freepass for local transport. |
Hakone Freepass (2-day): Approximately ¥7,100 from Shinjuku (as of 2025–2026). Covers round-trip between Shinjuku and Hakone plus unlimited use of the ropeway, sightseeing cruise, and local buses. If you are heading to Hakone anyway, this pass usually pays for itself.
Common DIY pitfalls: Arriving too late (noon haze has already built up), underestimating travel time between spots, missing the last bus back, and having no backup plan if the mountain is completely hidden.
Why a Guided Tour Might Be Better for Photography
A guided tour maximizes your “shot attempts per hour” — you never wait for a public bus, never search for a platform, and your driver knows exactly where to position the schedule for clear morning conditions.
| Feature | DIY Day Trip | Guided Tour |
|---|---|---|
| Flexibility | High — stay as long as you want at each spot | Low — fixed schedule |
| Logistics | Requires booking tickets & navigating | Zero effort — board the bus and shoot |
| Cost | ~¥5,000 – ¥10,000 (transport only) | ~¥10,000 – ¥15,000 (guide & transport included) |
| Best for | Solo travelers, serious photographers, sunrise chasers | Families, first-timers, limited schedules, anyone who hates reading bus timetables |
Frequently Asked Questions (FAQ)
What is the best month to photograph Mt Fuji?
November to February offers the highest probability of clear views. Winter air is cold and dry, minimizing the haze that obscures the mountain in summer. June to August is the worst period — high humidity and rain keep Fuji hidden most days.
What time of day is best for photographing Mt Fuji?
Before 9:00 AM, ideally at sunrise. Clouds and haze build up as the ground warms. By lunchtime, even a clear morning can turn into a completely hidden mountain. For Chureito Pagoda, aim to arrive by 6:00–7:00 AM.
Is it better to go to Kawaguchiko or Hakone for Mt Fuji photos?
It depends on what you want to capture. Kawaguchiko gives you massive, unobstructed Fuji shots with lakes and pagodas — ideal for photographers. Hakone offers more variety: volcanic valleys, torii gates, and hot springs, with Fuji as a dramatic distant backdrop.
Can I take good photos with just a smartphone?
Absolutely. Use your phone’s wide-angle lens (0.5x) for lake reflections at Oishi Park, and 2x–3x optical zoom at Chureito Pagoda to compress the pagoda-and-Fuji composition. Tap to expose on the mountain, wipe the lens for condensation, and shoot in burst mode on the ropeway.
What if Mt Fuji is covered by clouds on my day trip?
Have a backup plan. In Kawaguchiko, visit the Music Forest Museum or the Fujisan World Heritage Centre. In Hakone, spend the day at an onsen or the Open-Air Museum. Treat any Fuji sighting as a bonus — never as a guarantee.
Do I need to book transport and tours in advance?
Yes, especially during peak seasons. The Fuji Excursion train often sells out days in advance. Highway buses are also reservation-only. Tours should be booked at least a few days ahead, particularly during cherry blossom (April), autumn foliage (November), and New Year holidays.
Final Verdict
Here is how to decide based on your travel style:
- Choose the DIY route if: You are a serious photographer who wants to chase exact sunrise times, stay late for sunset, or visit spots that tours skip. You are comfortable navigating Japanese train and bus schedules, and you have the flexibility to adjust your plan if the weather changes.
- Choose a guided tour if: You have limited time, are visiting with family, or simply want to enjoy the scenery without worrying about train schedules. A tour maximizes your photo opportunities per hour because logistics are completely handled.
- For families with young children: Skip Chureito Pagoda (too many stairs). Focus on Oishi Park and Oshino Hakkai in Kawaguchiko, or the Hakone Ropeway and sightseeing cruise. A guided tour is strongly recommended — it saves you from managing strollers on crowded buses.
- For serious photographers: Go DIY to Kawaguchiko. Stay overnight if possible — sunrise and sunset are the golden hours, and public transport doesn’t run early or late enough for either.
- For solo travelers on a budget: Take the highway bus early in the morning, rent an e-bike at Kawaguchiko, and hit Oishi Park, Chureito Pagoda, and Honcho Street in one efficient loop.

Hi, I’m Kai. I’m a Tokyo-based travel writer, tourism industry insider, and the author of a published guidebook for international visitors to Japan. With over 10 years of professional experience at a leading Japanese tourism company, my mission is to help you skip the tourist traps and navigate Japan’s best destinations like a local. I believe the perfect day trip is like a traditional kaiseki meal: a beautiful balance of precise planning and unforgettable seasonal discovery. When I’m not out conducting field research, you’ll usually find me drafting new itineraries with one of my favorite fountain pens!