Mt. Fuji teasing the skyline, a volcanic valley that actually steams, a lake cruise on a “pirate ship,” and an onsen soak that makes Tokyo feel a thousand miles away—Hakone really does deliver that dream-day Japan vibe.
But if you’re staring at Hakone’s transport map thinking, “Wait… trains, cable cars, ropeways, boats, buses—what could possibly go wrong?” I get it. First-time visitors often worry about missing connections, buying the wrong ticket, or getting stuck in the mountains after the last ride stops.
This guide fixes that. You’ll get a realistic, time-stamped plan (with built-in buffers), plus clear “skip-this-first” rules so you stay relaxed—even if queues or weather throw a curveball.
And if you’d rather avoid the whole transfer-and-ticket puzzle entirely, here’s the easiest shortcut: Highly Recommended: Mt. Fuji + Hakone highlights day tour (greatest-hits, minimal thinking).
Check availability here: https://gyg.me/G5PO31Wv
Why Hakone Is Tokyo’s Best “Easy Nature Escape” (Even If You Don’t Speak Japanese)
What makes Hakone special (lake, ropeway, volcano valley, onsen towns)
Hakone is one of those places that feels like it was designed to be a day trip—huge variety, tight geography. In a single loop, you can go from a river valley station town (Hakone-Yumoto) up into cooler mountain air (Gora), float above ridgelines on the Hakone Ropeway, and then descend into the otherworldly, sulfur-scented landscape of Owakudani.
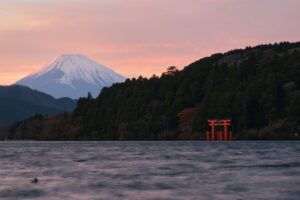
Then—just when you think it can’t get more cinematic—Hakone flips the mood. The ropeway drops you toward Lake Ashi (Ashinoko), where the water is calm, the mountains fold into the distance, and (on a clear day) Mt. Fuji can appear like a backdrop painted by a film studio. Add in centuries of onsen culture and the region’s famous hospitality, and you’ve got a perfect mix of adventure + exhale.
The magic is that the transportation itself is part of the experience: mountain railway switchbacks, a funicular-style climb, gondolas gliding across the skyline, and a lake cruise. It’s not “getting from A to B”—it’s the attraction.
Is Hakone realistic as a day trip? (time window + what you can/can’t fit)
Yes, Hakone is realistic as a day trip, but only if you treat it like a proper day trip: early start, purposeful pacing, and a willingness to pick priorities.
A full Hakone day is usually 10–12 hours door-to-door. Many attractions operate in a roughly 09:00–17:00 sightseeing window, and the big loop transport has an end-of-day cutoff (the ropeway and boats don’t run late into the evening). In practical terms: if you want to do the “full loop” experience, depart Tokyo around 7:30–8:00 and plan to be back in Tokyo around 8–9 PM.
What you can fit comfortably if you start early:
-
The “headline loop” (mountain train → cable car → ropeway → Owakudani → lake cruise)
-
Hakone Shrine (quick visit)
-
One extra: either a quick onsen soak or one museum
What tends to make a day trip go sideways:
-
Trying to do both an onsen and multiple museums
-
A slow sit-down lunch at peak time
-
Starting late and spending the rest of the day “chasing the clock”
Also, a reality check: even if Hakone is only about 80–90 minutes from Tokyo by direct limited express, moving around inside Hakone takes time because you’re swapping modes repeatedly. A streamlined loop still includes a lot of transit (which is scenic, but it’s still time).
Day trip vs overnight: a quick decision guide (who should stay the night)
Choose a day trip if…
-
You’re based in Tokyo and want mountains, hot springs atmosphere, and a “Fuji region” taste without moving hotels.
-
You’re happy with highlights and you can start early.
Choose an overnight if…
-
You want the classic ryokan rhythm: check-in → long soak → kaiseki dinner → quiet morning.
-
You want to visit multiple museums, hike longer trails, or wait out bad weather for better Fuji odds.
A day trip is “greatest hits.” Overnight is “slow luxury.”
And one more reassurance: Hakone is extremely used to international visitors. Major stations and transport have bilingual signage, and the loop is popular enough that you’ll rarely feel like you’re improvising alone.
Quick Planner: 3 Ways to Do a Hakone Day Trip From Tokyo
Option A — The classic DIY “Hakone Loop” using the Hakone Freepass
This is the classic “I want the Hakone experience” route. The Hakone Freepass bundles most of the transport on the loop so you’re not constantly stopping to buy tickets. It’s also the easiest option for first-timers who still want to DIY.
Best for: flexibility + value + the iconic loop
Option B — JR/Shinkansen-style approach (better if you’re already near Tokyo Station)
If you’re staying near Tokyo Station (or you’re already using JR heavily), the simplest JR-based approach is:
-
Shinkansen (often ~40 minutes) to Odawara
-
then ~15 minutes onward toward Hakone-Yumoto
It’s efficient, but inside Hakone you’ll still need local transport tickets or a pass.
Best for: Tokyo Station area, JR-heavy travelers, time efficiency to Odawara
Option C — Guided day tour (best if you want “maximum sights, minimum thinking”)
If you want to hit the big views without managing transfers, queues, and timing cutoffs, a guided tour is the “no mental load” option. You trade some flexibility for clarity and pacing.
Best for: tight schedules, transit anxiety, first day in Japan, “I just want it to work”
If you want the stress-free option:
Highly Recommended: https://gyg.me/G5PO31Wv
10-second “pick this if…” summary (so you decide fast)
| Option | Pick this if… | Trade-off |
|---|---|---|
| DIY Freepass loop | You want freedom and classic Hakone transport | You manage timing + transfers |
| JR/Shinkansen gateway | You’re near Tokyo Station / using JR already | You still DIY inside Hakone |
| Guided tour | You want maximum sights, minimal logistics | Less flexibility / weather still matters |
Tickets & Passes Made Simple (So You Don’t Buy the Wrong Thing)
What the Hakone Freepass covers (and what it doesn’t)
The Hakone Freepass is popular because it simplifies a complicated day: it covers the key Hakone-area transport and often includes discounts for certain attractions. For a day trip, the big win is psychological: you stop worrying about “Do I need a ticket for this leg?” and start focusing on the experience.
Key prices to know (common reference points):
-
Hakone Freepass (2-day, from Shinjuku): ¥7,100
-
Hakone Freepass (2-day, from Odawara): ¥6,000
Even if you’re only going for a day, the pass still often makes sense because the loop’s transport adds up quickly—especially if you’re doing the ropeway and cruise.
What it does not cover: the Romancecar reserved seat fee (more on that below). That’s the #1 “oops” purchase moment.
Romancecar vs regular Odakyu trains (time, comfort, and the extra fee)
The Odakyu Romancecar is the cleanest start to your day:
-
Direct from Shinjuku → Hakone-Yumoto
-
Around 85–90 minutes
-
Reserved seating, comfortable, and frankly just easier when you’re trying to start strong
But here’s the critical detail:
Common mistake: assuming the Freepass includes the Romancecar seat charge.
It doesn’t. You still need the limited express surcharge.
Romancecar limited express surcharge:
-
¥1,200 each way (so ¥2,400 round-trip)
Many travelers love the early Romancecar because it can feel calm compared to regular commuter lines. I’ve seen people describe the early limited express as quiet and comfortable—while the regular trains behind it get packed fast. That matches what you’d expect: the early reserved seats “lock in” your morning.
When regular trains are fine:
If Romancecar is sold out or you’re cost-cutting, take the regular Odakyu route. It can be slower and more crowded, but it works—just be mentally prepared for a couple of transfers and less personal space.
Digital passes (EMot) vs paper passes (what’s easier for foreigners)
For first-timers, digital passes can reduce friction. You buy on your phone, you’re not hunting down the right counter, and you avoid a “wait, is this the correct ticket window?” moment when your brain is still warming up.
Paper passes are still totally fine, especially if you like having something physical to show and you prefer asking staff questions face-to-face.
My practical advice:
-
If you like simplicity and hate queues: go digital.
-
If you like reassurance and want to ask “Is this right?”: buy at the counter.
If you have a JR Pass: when JR routes make sense (and when they don’t)
If you have a JR Pass, it can help you reach Odawara efficiently (often via Kodama shinkansen). From Odawara, you connect into the Hakone area.
When JR makes sense:
-
You’re near Tokyo Station
-
You’re already doing lots of JR travel and want consistency
-
You want the fastest “gateway” ride to Odawara
When it doesn’t solve everything:
Hakone’s loop is mostly non-JR. Even if JR gets you to Odawara, you’ll still need a strategy inside Hakone—either the Freepass (from Odawara) or individual tickets.
IC cards (Suica/PASMO) + cash: what you’ll actually need on the day
Bring both. Seriously.
IC cards (Suica/PASMO) are great for:
-
Trains and many buses
-
Quick convenience store purchases
-
Small “tap and go” moments that keep your day moving
But here’s the nuance: while IC cards work broadly, you shouldn’t assume you can just “tap through” every sightseeing leg like the ropeway and boat. You may need separate ticketing (or a pass), and the experience is smoother if you’re not improvising purchases at every transfer.
Cash matters in Hakone more than you’d think:
-
Small snack stands (including iconic Owakudani foods)
-
Little souvenir shops
-
Some local restaurants
You’ll find ATMs (including convenience store ATMs), but don’t make “finding cash” a mid-day mission.
Understanding the “Hakone Loop” (Clockwise vs Counter-Clockwise)
What “the loop” is (the sightseeing circuit that connects the highlights)
The Hakone Loop is the classic sightseeing circuit that stitches Hakone’s transport experiences into one continuous story.
The simple mental model:
-
Trains up (Hakone-Yumoto → Gora)
-
Ropeway across (Gora/Sounzan → Owakudani → Togendai)
-
Boat over (Lake Ashi cruise)
-
Bus back (to Hakone-Yumoto / Odawara corridor)
It’s satisfying because it feels like you’re making progress through a landscape—valley to ridge to crater to lake—without ever needing a car.
Why counter-clockwise can feel less crowded (and when clockwise wins)
In practice, the direction you choose affects crowds and stress.
Counter-clockwise often feels smoother because you’re climbing into the mountains first and hitting the ropeway before the late-morning crush peaks—if you start early.
Clockwise can win if:
-
You want to visit the shrine earlier
-
You’re trying to avoid late afternoon road congestion near the lake area (buses leaving Moto-Hakone can slow down around commute hours)
Crowds in Hakone can be intense on weekends and holidays, especially in October–November (autumn colors). Direction won’t “fix” a busy day, but it can reduce how many times you’re standing in a long line at the same time as every tour group.
The one rule that makes or breaks your day: start early
Here’s the blunt truth: starting late is the silent killer of Hakone day trips.
If you leave Tokyo at 10 AM, you can still have a nice day in Hakone—but you’re no longer doing the full loop comfortably. Your best day-trip version starts early enough that you’re moving through Hakone by around 9 AM.
The Perfect Hakone Day Trip Itinerary (Hour-by-Hour, Realistic Timing)
This is a “follow-along” schedule that’s meant to feel like a friend saying, “Do this next, then this, and here’s what to skip if you’re behind.” Use it as your backbone.
6:30–7:30 — Depart Tokyo (which station to start from and why)
Best DIY starting point: Shinjuku Station (Odakyu).
Why? It’s built for Hakone day-trippers. The ticketing, signage, and station flow are geared toward visitors heading out early.
Your target: be on a train around 7:30–8:00. Earlier is even better if you want the calmest start and the shortest queues.
Pro tip: If you’re taking Romancecar, reserve as soon as you know your date. Reserved seats can sell out, and the whole point is removing uncertainty.
8:00–9:30 — Arrive Hakone-Yumoto: coffee + lockers + bathroom break
Treat Hakone-Yumoto like your “basecamp prep” moment.
Do this in order:
-
Restroom break (you’ll be glad you did before the mountain segments)
-
Lockers or storage if you have extra bags
-
Hakone-Yumoto is known for having large coin lockers and a staffed storage counter
-
Other stations like Gora and even Togendai often have lockers too, but Yumoto is the easiest “start clean” point
-
-
Fast breakfast
If you didn’t eat in Tokyo, grab something now. Skipping breakfast is one of those tiny decisions that turns into a big mood crash by late morning.
Hands-free option: If you’re traveling onward later (not just day-tripping), Hakone also has baggage delivery services around ¥900–¥1,000 in many cases, which can be worth it if you’re moving hotels.
9:30–10:10 — Hakone Tozan Railway: the scenic climb (what to expect)
This mountain railway leg is pure Hakone character—switchbacks, forest views, that feeling of climbing into cooler air.
Timing reality: the Hakone-Yumoto → Gora ride is about 40 minutes.
This is not the leg to rush; it’s part of the charm. Just keep your eye on the clock so you don’t lose your buffer later.
Etiquette note: local trains are quiet. Keep voices low and don’t take phone calls. (This is Japan’s default “public transport vibe.”)
10:10–10:30 — Gora: quick stop + how to transfer smoothly
Gora can look confusing on a map, but in real life it’s manageable.
What helps:
-
Assume you’ll spend a few minutes orienting (that’s normal)
-
Follow signs for the cable car
-
Don’t panic if you step outside briefly—some transfers require a short walk
If you’re traveling with kids or anyone with mobility limitations, this is also a smart spot for a quick break before the ropeway segments.
10:30–10:45 — Cable car: how to position yourself for views
This short climb is where you start getting “that Hakone feeling.”
View strategy:
Sit/stand on the side facing the wider valley when possible (and don’t stress if you guess wrong—curves shift the perspective). If you’re carrying a coffee, make sure it’s sealed; things move and sway more than you expect.
10:45–11:20 — Ropeway to Owakudani (best side of the gondola)
The ropeway is a highlight because it shifts from forested slopes to dramatic open views—sometimes you’ll get a sudden glimpse of Fuji, sometimes it’s pure clouds and atmosphere.
Timing reality: Ropeway travel is surprisingly efficient—each main segment is roughly 15 minutes. The bigger time variable is queueing, especially late morning.
Crowd strategy:
The first wave of departures around 10 AM tends to feel calmer than midday. That’s why the early Tokyo start matters so much.
11:20–12:10 — Owakudani: black eggs, viewpoints, safety notes
Owakudani is an active volcanic valley—steaming vents, sulfur scent, and terrain that feels almost lunar.
What to do here:
-
Walk to a viewpoint (within the safe, marked areas)
-
Try the famous black eggs (kuro-tamago) as a quick snack
-
Browse the small shops if you’re into quirky souvenirs
Safety, without drama:
Stay on marked paths. Volcanic gas conditions can change, and closures happen. If any area is roped off, don’t treat it like a “photo challenge.” Hakone is tourist-friendly, but it’s still an active landscape.
12:10–12:40 — Ropeway to Togendai: the Lake Ashi reveal moment
This is one of those “wow” transitions: crater landscape → ridgeline → lake suddenly opening below you. Even if Fuji is hiding, Lake Ashi is still gorgeous.
If you’re behind schedule, this is also where you start thinking: “Do we still do the cruise + shrine, or do we prioritize one?” (I’ll give you those decision rules below.)
12:45–13:20 — Lake Ashi cruise: which ship/time slots to target
The Lake Ashi sightseeing cruise is fun and easy—no hiking required, and you get a fresh angle on the landscape.
Timing reality: departures are generally in the 10:00–16:00 range, and the ride itself is roughly 30 minutes depending on which stretch you take.
Crowd strategy:
Midday can be packed, especially weekends. If you see a huge line, don’t let it derail your mood. You have three good choices:
-
Take the next departure and use the wait to snack + reset
-
Skip the “special room” and just board standard (still fun)
-
If you’re running late, skip the cruise and go straight to the shrine area (or return route)
13:30–14:30 — Hakone Shrine + Heiwa no Torii: photo strategy without wasting 2 hours
This is the time trap. The iconic torii photo spot can produce long lines, and it’s easy to burn your entire afternoon here if you’re not careful.
A smarter photo plan:
-
Get your “proof photo” first (wide shot, even if people are around)
-
Then decide if you want the line for the “perfect” angle
If you’re still on schedule and you care deeply about the shot, go for it.
If you’re behind schedule, take the win and move on.
Mobility note: There are stairs involved around the shrine area, and getting down to the lakefront torii includes a long set of steps (often cited as around 89 steps). If anyone in your group has knee issues, prioritize comfort over the “must-do” photo queue.
14:30–15:15 — Optional add-on: quick onsen OR quick museum (pick one)
This is where your travel style matters.
Option A: Quick onsen (best for “I want relaxation”)
Day-use onsen often cost around ¥1,500–¥2,000. If you’re feeling tired, a short soak can transform the rest of your day. The key is choosing a place that doesn’t require complicated detours.
Option B: Quick museum (best for “I want culture / weather is meh”)
Hakone has genuinely excellent museums. The Open-Air Museum is a popular choice because it’s easy to enjoy even when Fuji is hiding.
Don’t try to do both unless your day is running perfectly and you’re willing to keep both stops short.
15:15–17:30 — Return to Tokyo: the “don’t miss the last connection” plan
This is the calm part of the day if you handle it correctly.
Here’s your safety net mindset:
-
Ropeway and boats stop earlier than you think (last boat often around 5 PM, last ropeway boarding often around 4:30 PM depending on season/conditions).
-
Late afternoon buses from the lake area can slow down due to road congestion (this is a common “why is this taking so long?” moment).
My rule: If you haven’t started your return chain by late afternoon, do it.
Trains back to Tokyo from Hakone-Yumoto typically run into the evening (often around 8–9 PM for “safe return” options), but you don’t want to be the person sprinting for the last ropeway cabin.
Stop-by-Stop Deep Dive (What’s Worth It, What’s Overhyped)
Hakone Ropeway: how long it takes + what can shut it down (wind/weather)
The ropeway is one of Hakone’s best “effort-to-reward” ratios. You get big views without big hiking.
How long it takes (useful for planning):
-
Each segment is about 15 minutes of ride time
-
The total ropeway “across” time isn’t huge—the queue time is what changes day to day
What can shut it down:
Wind and weather. Hakone is mountainous, and conditions can change fast. If the ropeway suspends service, it doesn’t mean your day is ruined—it just means you switch to Plan B (museum + onsen + one lake-area stop, or vice versa).
Owakudani: best viewpoints + what the “black eggs” actually are
Owakudani’s viewpoints vary depending on what’s open and what’s safe that day. The “best” viewpoint is often simply the one with the clearest visibility at the moment you arrive.
Black eggs, explained simply:
They’re eggs boiled in the hot spring waters, which darken the shell. It’s a classic Hakone snack because it’s weird, iconic, and genuinely fun to try once.
A small but important detail: Owakudani can have steep paths and stairs depending on where you wander. If someone in your group has mobility limitations, enjoy the station area and viewpoints that are easy to reach rather than forcing the steepest route.
Lake Ashi cruise: how to avoid the most crowded departures
Crowds tend to spike late morning through mid-afternoon. To avoid the worst of it:
-
Start early (it solves everything)
-
Be flexible about departure time
-
If it’s packed, treat the cruise as optional rather than mandatory
Also, if you’re traveling with kids: the boat is a nice “everyone sits down” reset. That alone can make it worth keeping.
Hakone Shrine & the iconic torii gate: sunrise vs midday reality
If you could teleport, sunrise would be dreamy. In real life, day-trippers usually hit this midday—meaning lines, people, and a lot of camera choreography.
The move is to manage expectations:
-
Midday = busy, but still beautiful
-
Your goal is a good memory, not necessarily a perfectly empty frame
And shrine etiquette matters: photos are fine, but keep voices low and be respectful around people praying.
Hakone Open-Air Museum: when it’s the smartest “Plan B” stop
If Fuji is hiding, the Open-Air Museum becomes an easy “no regrets” decision because it’s excellent regardless of weather.
Why it works on a day trip:
-
You can enjoy it in 60–90 minutes if you keep moving
-
The paths are generally wide and comfortable; many visitors find it accessible and less stressful than more transfers
It’s also a great option if you’re feeling “transport fatigue.” After a bunch of modes, walking through art and open air can feel grounding.
Onsen towns: which areas are easiest to squeeze into a day trip
If you want a day-use onsen without complicated detours, Hakone-Yumoto is usually the most efficient base because it’s where you arrive and depart.
Gora can work too, but timing is trickier—especially if you’re noticing that many local restaurants and shops can go quiet mid-afternoon (some close between 2–5 PM). This matters more than people expect.
Skip-this-if rule:
If it’s already mid-afternoon and you’re behind schedule, skip the “perfect onsen” hunt and choose the simplest one near your route—or skip it entirely and return smoothly.
Food Plan: Where to Eat Without Derailing Your Timeline
The fastest lunch strategy (so you don’t lose 90 minutes to waiting)
Here’s the honest truth: the biggest time sink in Hakone is not the ropeway—it’s waiting for food when everyone is hungry at the same time.
The fastest strategy is a two-part food plan:
-
Breakfast early (Tokyo or Hakone-Yumoto)
-
Snack-forward lunch (Owakudani / quick counters near transport hubs)
Then do a real dinner back in Tokyo.
This keeps you moving and prevents the late-afternoon restaurant disappointment (when you arrive somewhere cute and everything is closed).
What to eat in Owakudani (snacks + timing)
Owakudani is perfect for snack lunch:
-
Black eggs
-
Simple hot foods
-
Grab-and-go items
Timing advice: If it’s already around noon and you haven’t eaten, snack here. Don’t gamble on finding a perfect sit-down place later.
Gora/Hakone-Yumoto comfort foods to look for (easy for picky eaters)
If you need “safe” food choices:
-
Soba/udon
-
Tempura
-
Curry
-
Bakeries and cafes near stations
Hakone-Yumoto is particularly good for quick station-adjacent options.
Dietary needs (vegetarian/gluten-free) in rural tourist areas: how to order politely
Hakone is touristy, but smaller eateries can have limited English—especially for dietary detail.
What helps:
-
Keep your request simple (no meat / no fish / no wheat)
-
Use a translation app for menus
-
Have a backup snack plan (combini food saves the day more often than people admit)
Dinner on the way back to Tokyo (station food + convenience-store backup)
The ride back is a great time for a bento if you’re on a limited express. Just remember: Japan’s trains are quiet spaces, so keep it tidy and low-key.
And don’t underestimate the “Tokyo Station dinner” option—stations are basically mini food cities.
Decision point you can use:
If it’s already 12:30 and you’re not at Owakudani yet, switch to snack-lunch mode. If you wait longer, you’ll lose time and you’ll get cranky.
Onsen 101 for Western Travelers (No Stress, No Surprises)
Day-use onsen vs ryokan onsen: what you can do on a day trip
On a day trip, you’re looking for day-use onsen—pay an entrance fee (often around ¥1,500–¥2,000), soak, rinse, and head out.
A ryokan onsen is a different rhythm: slow, private, and ideally paired with staying the night. You can enjoy onsen culture as a day-tripper—it’s just a “quick dip” version.
Tattoo rules: how to check policies without awkwardness
Tattoo policies vary by facility.
The simplest approach:
-
Check the facility’s policy online before you go (many have clear rules)
-
If you have small tattoos, carry skin-tone cover patches
-
If you’re unsure, ask at the counter politely and briefly
Don’t take it personally—this is a cultural norm that’s slowly changing, but not uniform.
What to bring (and what’s provided): towels, lockers, skincare, hair ties
Most day-use onsen provide a lot, but bring:
-
A small towel (or be ready to rent one)
-
Hair tie (long hair should be tied up)
-
Minimal skincare if you’re picky
Lockers are standard, and facilities are used to travelers.
Step-by-step bathing etiquette (the 60-second version)
If you’ve never done onsen before, this is the “no panic” version:
-
Shoes off at the entrance
-
In the changing room: undress (onsen is usually nude, gender-separated)
-
At the washing stations: wash thoroughly before entering the bath
-
Enter the bath clean, move calmly, keep towels out of the water
-
Tie up long hair and keep noise low
That’s it. You don’t need to memorize a ritual—you just need to be considerate.
“I’m shy / I’m traveling with family”: privacy-friendly alternatives
If communal bathing feels intimidating:
-
Look for facilities with private baths (rental rooms)
-
Consider “swimwear onsen” style places (more family-friendly, less cultural pressure)
Mini onsen checklist (quick copy in your notes):
-
Cover patches (if needed)
-
Hair tie
-
Small towel
-
Cash/IC card
-
A calm attitude (everyone is there to relax)
Seasons, Weather & Mt. Fuji Visibility (How to Maximize Your Odds)
Best seasons for clear views (and what “clear” really means)
Fuji visibility is the ultimate “Japan travel gamble.” Even on a day that looks fine in Tokyo, Hakone can be misty—mountains create their own weather.
In general, cooler, drier days often feel clearer, but there are no guarantees. The best strategy isn’t obsessing over forecasts—it’s planning a day that’s enjoyable even without Fuji.
Top Fuji-view moments in this itinerary (and where people miss them)
Your best “Fuji surprise” moments are usually:
-
During ropeway segments when the sky opens up
-
Along Lake Ashi when visibility is good
-
At higher elevations when clouds sit lower
Where people miss it: they spend the whole day with their camera packed away, then scramble when Fuji appears for 45 seconds. Keep your camera ready during ropeway stretches.
What to do on a cloudy day (a “no regrets” indoor-forward itinerary)
Cloudy Hakone can still be fantastic if you lean into the right experiences:
-
Museum time (Open-Air Museum is a classic)
-
Onsen time (clouds make hot springs feel extra cozy)
-
Scenic transport for atmosphere rather than views
If your goal is “perfect Fuji photo,” clouds feel disappointing. If your goal is “amazing day out of Tokyo,” clouds are still fine.
If transport gets disrupted (ropeway closures, delays): your reroute playbook
This is the part that makes first-timers anxious—so here’s a calm framework.
Plan A (everything runs normally):
Full loop as written (train → cable → ropeway → Owakudani → cruise → shrine → return)
Plan B (ropeway disrupted):
Museum + onsen + one lake-area stop (choose the one that matters more: cruise OR shrine)
Plan C (timing collapsing / queues brutal):
Pick two core experiences and do them well:
-
Owakudani + onsen
or -
Lake Ashi + shrine + quick café
Then return early and stress-free.
Your day is only “ruined” if you refuse to adapt.
The 10 Mistakes That Ruin a Hakone Day Trip (And How to Avoid Them)
Starting late (the silent killer)
Starting late doesn’t just shorten your day—it multiplies your stress. You arrive right when queues peak, you lose buffers, and you start making panicky choices.
Fix: commit to the early train. If you can’t, use an alternative itinerary (see below).
Underestimating transfers (and how to spot the right platform fast)
Hakone looks complicated on a map, but on the ground it’s surprisingly intuitive—if you stay calm.
Fix:
-
Follow English signage (it’s common at major points)
-
Don’t be afraid to ask staff “Ropeway?” “Cable car?” (simple words work)
-
Build tiny buffers—assume transfers take 5–10 minutes
Forgetting the Romancecar needs reserved seating (and what to do if it’s sold out)
This is the #1 ticket gotcha. Romancecar is comfortable because it’s reserved—meaning it can sell out.
Fix:
-
Reserve early if you want it
-
If it’s sold out, take regular Odakyu trains and accept that it may be busier
Trying to “do everything” (why one museum + one onsen is already a win)
People try to stack: full loop + shrine + museum + onsen + shopping street + sunset photos… and then wonder why the day feels like a marathon.
Fix: Choose your “big three”:
-
Ropeway/Owakudani
-
Lake Ashi area
-
One extra (museum OR onsen)
If you manage a bonus, great. But don’t schedule your day like a checklist you must conquer.
Carrying luggage instead of using lockers (and where to stash bags)
Dragging bags makes every transfer harder, every queue more annoying, and every bus ride more exhausting.
Fix: Use lockers/storage. Hakone-Yumoto is the easiest place to stash bags at the start. Other hubs often have lockers too.
The other 5 “quiet” mistakes (quick hits)
-
Skipping breakfast → cranky decisions by noon
-
Assuming restaurants are open mid-afternoon (many close 2–5 PM)
-
Not carrying cash → snacks/souvenirs become annoying
-
Ignoring the last-ride cutoffs (boat/ropeway end earlier than trains)
-
Freezing when something changes → adapt with Plan B/C instead
Alternative Itineraries (Because Not Everyone Wants the Full Loop)
Hakone half-day plan from Tokyo (the only version that’s actually realistic)
A “half-day” from Tokyo only works if you’re ruthless. You cannot do the full loop and call it half-day. The realistic half-day is:
-
Tokyo → Hakone-Yumoto
-
Choose one: quick onsen or one museum
-
Short stroll/photo moment
-
Return
If you’re deciding between half-day and full-day, this guide helps:
https://onedayawaytravel.com/ihakone-half-day/
“I only care about onsen + views” minimalist itinerary
This is the “I want to feel good” plan:
-
Go early to Hakone-Yumoto
-
Day-use onsen (aim for ¥1,500–¥2,000)
-
If skies are clear: quick viewpoint or lake-area photo moment
-
Return before late-afternoon congestion
It’s not the full loop, but it’s deeply satisfying—especially if you’ve had a busy Tokyo itinerary.
“I only care about art/museums” rainy-day itinerary
For art lovers (or cloudy days):
-
Tokyo → Hakone-Yumoto → Open-Air Museum
-
Add one more museum or a café stop
-
Skip ropeway/cruise if visibility is poor or queues are heavy
This can be one of the most relaxing versions of Hakone.
With kids: strollers, snack timing, and avoiding long queues
Hakone is doable with kids, but you want to reduce friction.
-
Expect to fold strollers on crowded buses
-
Snack early and often (don’t rely on late lunches)
-
Treat the lake cruise as a “sit-down reset”
-
Choose fewer transfers over “doing everything”
A “shorter loop” can be a better family win than forcing a full circuit.
Accessibility considerations (mobility limits, lots of stairs, backup stops)
Hakone’s main loop has a decent accessibility baseline, but there are pinch points:
-
Ropeway stations are generally manageable, but Owakudani viewpoints can involve steep areas
-
Hakone Shrine includes stairs; the iconic torii photo area can be physically demanding
-
Buses can be crowded (standing on winding roads is tiring and unstable)
Strategy: prioritize the ropeway/cable segments (less walking), choose museums for smoother paths, and build more time for movement.
Overnight upgrade: what you gain by staying one night (and where to base)
One night transforms Hakone from “adventure day” to “mountain retreat.”
-
You experience the quiet after 5 PM (when day-trippers leave)
-
You can soak without watching the clock
-
You can split the loop across two days or add hiking/museums
Best bases depend on your style, but Hakone-Yumoto is practical for transport, while Gora feels more “mountain resort.”
When a Guided Tour Is the Better Choice (Honest Pros & Cons)
Who should not DIY (tight schedule, anxiety about transfers, first day in Japan)
DIY is totally doable—but it’s not always the best use of your energy.
You probably shouldn’t DIY if:
-
This is your first day or two in Japan and you’re still adjusting
-
You get stressed by transfers, platforms, and timing cutoffs
-
You have a tight evening plan in Tokyo you can’t miss
-
You’re traveling with someone who would hate a “rushed logistics day”
There’s no prize for suffering through a complicated route if it’s not fun for you.
What a good tour “solves” (navigation, pacing, language barrier, must-hit highlights)
A good tour removes:
-
Ticket decision fatigue
-
The “are we on the right bus?” guessing game
-
Timing math (especially around last rides and traffic)
-
Language friction in rural moments
-
The pressure to optimize every connection
It also helps with pacing: a good guide knows when to move, when to pause, and what’s realistic in one day.
What to look for before booking (English guide, meeting point, inclusions, cancellation)
Before you book, check:
-
Meeting point (is it easy to reach from your hotel?)
-
English guidance quality
-
What’s included (ropeway? lake cruise? lunch?)
-
Cancellation policy (weather and visibility can change plans)
Reality check: tours are also weather-dependent (how to set expectations)
No tour can guarantee Fuji. And if the ropeway suspends service due to weather, tours also adjust. The right mindset is: you’re paying for smooth logistics + a strong itinerary, not a guaranteed postcard photo.
The easiest “Hakone + Fuji highlights” option for one-day planners
If you want the “greatest hits” day with minimal mental load, this is the easiest one-stop option:
Book here: https://gyg.me/G5PO31Wv
If you’re still deciding whether a tour is worth it (cost vs convenience), this breakdown is helpful:
https://onedayawaytravel.com/mt-fuji-hakone-day-tour-from-tokyo/
FAQ (The Questions Western Travelers Actually Google)
Is Hakone worth it as a day trip from Tokyo?
Yes—if what you want is mountains, fresh air, onsen culture, and iconic scenery without moving hotels. The key is starting early and aiming for highlights.
Is one day enough to do the Hakone Loop?
It can be, but it’s a full day. You’ll be moving a lot, and you need to respect the fact that many attractions and transport options wind down by late afternoon. If you want slow relaxation, overnight is better.
Do I need the Hakone Freepass for a day trip?
If you’re doing the loop, the pass often makes the day simpler and smoother because you’re not buying separate tickets repeatedly. If you’re doing a minimalist itinerary (one museum + onsen), you may be fine without it.
Do I need to reserve the Romancecar in advance?
If you want the convenience (and your date is a weekend/holiday), yes—reserve when you choose the date. If it’s sold out, you can still get there via regular trains.
Can I do Hakone with just an IC card (Suica/PASMO)?
Partially. IC cards are useful on trains and many buses, but for loop sightseeing legs you’ll usually want a pass or separate tickets. Bring cash as backup for smaller purchases.
What are the typical ropeway operating hours? (and why they change)
A common operating window is roughly 09:00–16:15, but it varies by season and conditions. Weather (especially wind) can affect operations, so always stay flexible.
Can I see Mt. Fuji from Hakone?
Sometimes. On clear days, yes—especially around higher viewpoints and the lake area. But visibility is never guaranteed, so plan a day you’ll love even without Fuji.
Is Hakone tattoo-friendly for onsen?
Policies vary. Some allow tattoos, some require covering, and some don’t allow them. If you have tattoos, check in advance and bring cover patches.
What’s the best time of day to photograph the torii gate at Lake Ashi?
Earlier is calmer. Midday can mean queues. If you’re day-tripping, don’t let the line eat your entire afternoon—get a good shot and move on.
Is Hakone doable in winter / rainy season?
Yes. In winter, it can feel crisp and beautiful. In rainy season, it can be misty and atmospheric—just lean into museums and onsen if visibility is poor, and keep Plan B ready for transport changes.
Conclusion: Your Best Hakone Day Trip Game Plan
If you remember nothing else, remember this: Hakone rewards early starters. Start your day strong, keep your plan realistic, and you’ll have one of those “We escaped Tokyo and saw a totally different Japan” days.
The winning formula:
-
Leave Tokyo early (seriously—it changes everything)
-
Use a pass/route plan so you’re not improvising tickets
-
Build buffers for queues, wind, and traffic
-
Choose either an onsen or a museum if your timing is tight
Now pick your style:
-
DIY Loop Checklist (do it yourself): follow the hour-by-hour itinerary and use the “skip-this-first” rules when you’re behind.
-
Book the Stress-Free Day Tour (do it easy): https://gyg.me/G5PO31Wv