
Looking for the best Kamakura photo spots in one day? Start with these five: Kamakura Koko-mae Station, Kotoku-in Temple, Hokokuji Temple, Hasedera Temple, and Enoshima Island. Together, they give you the strongest mix of train-and-sea views, the Great Buddha, bamboo, temple gardens, coastal scenery, and sunset light.
The important part is not only where you go, but when. Kamakura looks very different at 7:30 AM, noon, and golden hour. This guide shows the best time to shoot each location, how to connect the route in one day, what fees to expect, and when it is smarter to book a guided Kamakura and Enoshima day trip instead of handling every transfer yourself.
Quick Answer: Best Kamakura Photo Spots by Type
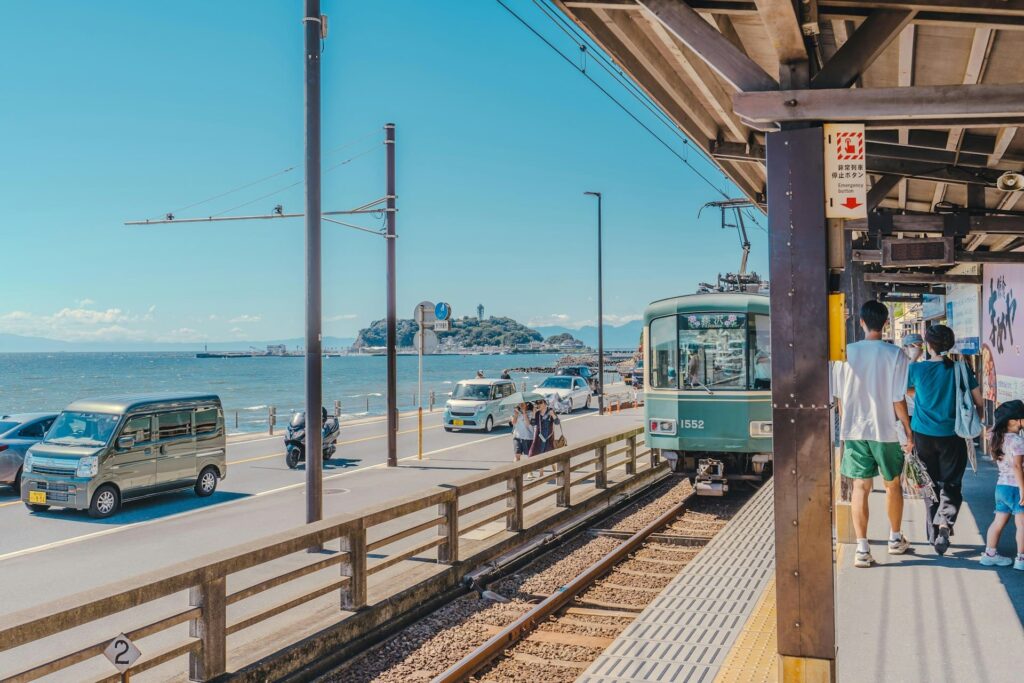
- Best iconic train photo: Kamakura Koko-mae Station, especially the oceanfront railway crossing often associated with Slam Dunk.
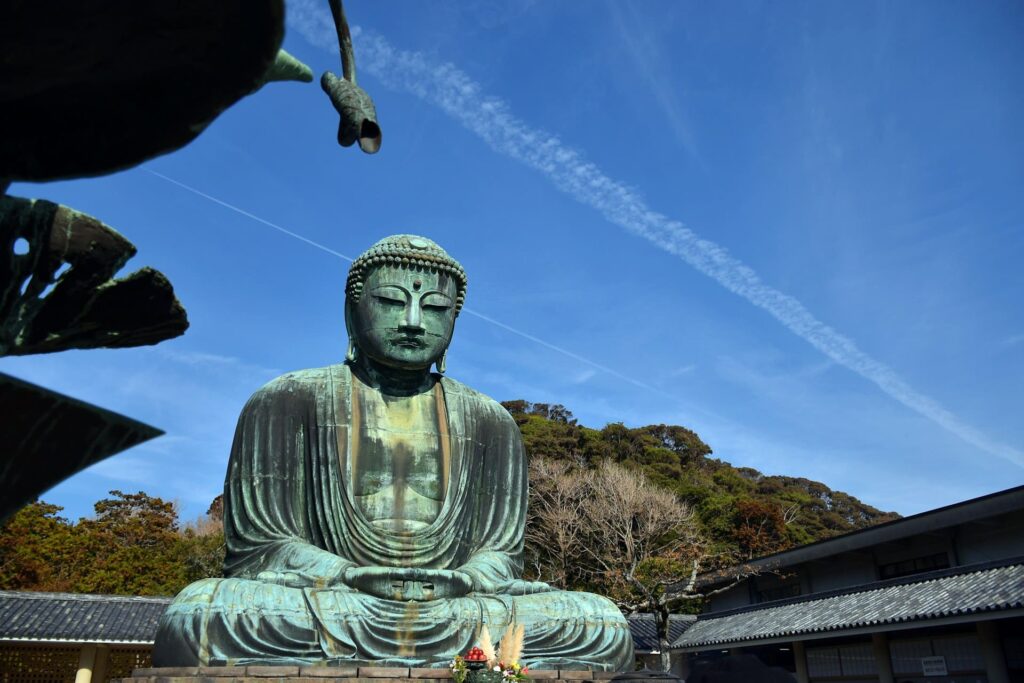
- Best temple landmark shot: Kotoku-in Temple, home of the Great Buddha of Kamakura.
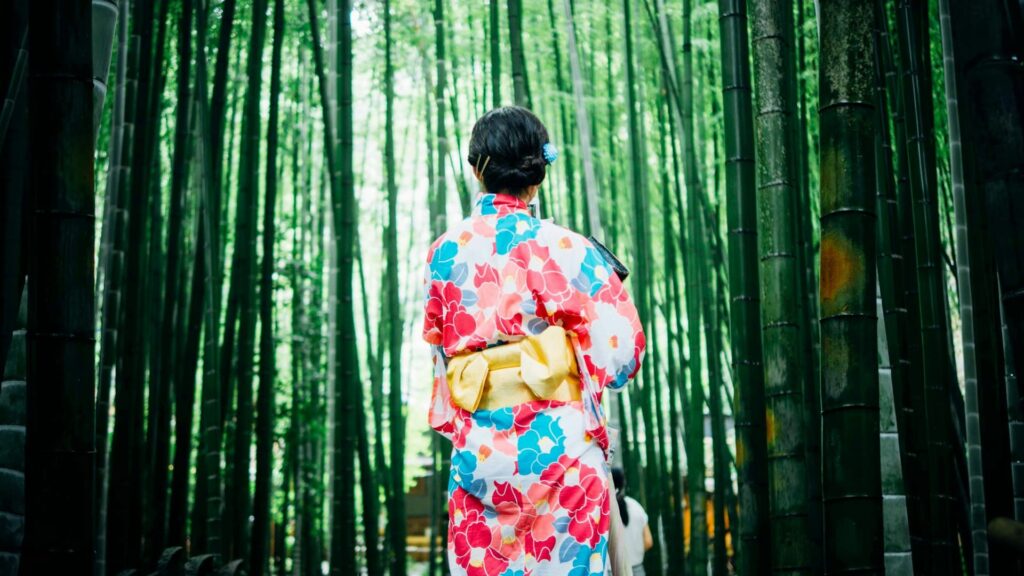
- Best bamboo photo spot: Hokokuji Temple, a compact bamboo garden that is much easier to photograph than Kyoto’s busiest groves.
- Best gardens and hillside views: Hasedera Temple, with flowers, small Jizo statues, and a view toward Sagami Bay.
- Best sunset and Mt. Fuji views: Enoshima Island, especially on clear winter afternoons.
If you only have one day, do not try to cover every famous temple in Kamakura. These five Kamakura photo spots are enough for a full, varied photo route. If you want the lowest-stress version from Tokyo, compare the DIY route with a guided day trip before you commit to your schedule.
Kamakura Photo Spots at a Glance
| Spot | Best For | Best Time | Admission | What You Can Shoot |
|---|---|---|---|---|
| Kamakura Koko-mae Station | Enoden crossing photo | Early morning | Free | Train, crossing, ocean backdrop |
| Kotoku-in Temple | Great Buddha photos | Morning | Adults ¥300; children ¥150; Buddha interior extra ¥50 | Evenly lit bronze Buddha, low-angle landmark shots |
| Hokokuji Temple | Bamboo photography | Late morning to midday | Bamboo garden: adults/high school+ ¥400; elementary/junior high ¥200; matcha extra ¥600 | Dense bamboo grove, upward wide shots, tea house views |
| Hasedera Temple | Gardens and coastal views | Mid-afternoon | Adults ¥400; children 6–11 ¥200 | Flowers, Jizo statues, hillside paths, Sagami Bay |
| Enoshima Island | Sunset and Mt. Fuji | Late afternoon to golden hour | Island free; Sea Candle and Escar are paid | Cliffs, sea, sunset, Fuji on clear days |
Admission Fees & Opening Hours to Check Before You Go
Fees and hours change more often than most travel articles admit, especially around seasonal events, hydrangea season, and Enoshima night illuminations. Use the table below for planning, then confirm the latest details on the official or booking page before you visit.
| Spot | Current Planning Notes | Opening Hours | Important Notes |
|---|---|---|---|
| Kotoku-in Temple | Adults ¥300; children 6–12 ¥150; extra ¥50 to enter inside the Great Buddha | Apr–Sep: 8:00–17:30 Oct–Mar: 8:00–17:00 Interior: usually 8:00–16:30 |
Last entry is shortly before closing. No reservation is usually needed for normal visits. |
| Hokokuji Temple | Bamboo garden: ¥400 for high school students and older; ¥200 for elementary/junior high students Matcha with sweet: ¥600 |
9:00–16:00 Matcha ticket sales usually until 15:30 |
Closed around Dec 29–Jan 3 and may close in bad weather. Matcha tickets can pause during busy periods. |
| Hasedera Temple | Adults ¥400; children 6–11 ¥200 | Jul–Mar: 8:00–17:00, last entry 16:30 Apr–Jun: 8:00–17:30, last entry 17:00 |
Hydrangea season can bring special crowd controls, separate path arrangements, or adjusted procedures. |
| Kannon Museum at Hasedera | Separate paid admission | Generally daytime hours, with last entry before closing | Good rainy-day fallback, but check the latest museum fee and temporary closures before relying on it. |
| Enoshima Sea Candle / Escar | Reference pricing: Sea Candle adults ¥800; Escar adults ¥500; Sea Candle set ticket with Escar adults ¥1,100 | Hours vary by facility, season, and night events | Night events and weather can affect ticketing and operating hours. Confirm the current ticket before buying. |
All prices above are planning references, not a guarantee. Always check the official site or the booking page before your visit, especially during weekends, holidays, hydrangea season, and Enoshima illumination periods.
How to Get Between the Photo Spots
The five spots in this guide are connected by the Enoden train line, local buses, and short walks. The route is doable in one day, but the weak point is Hokokuji: unlike Hase, Kotoku-in, Kamakura Koko-mae, and Enoshima, it is not directly on the Enoden line.
- Kamakura Station → Kamakura Koko-mae Station: Enoden, about 15 minutes.
- Kamakura Koko-mae Station → Hase Station: Enoden, a short ride toward the Hase area.
- Hase Station → Kotoku-in Temple: Walk about 7–10 minutes.
- Hase Station → Hasedera Temple: Walk about 5 minutes.
- Kamakura Station → Hokokuji Temple: Local bus toward the Jomyoji area, then a short walk.
- Hase Station or Kamakura Station → Enoshima area: Enoden toward Enoshima, then walk across the bridge to the island.
If you plan to ride the Enoden several times, the Enoden 1-Day Pass “Noriorikun” is worth checking. It is usually sold at Enoden ticket machines and gives unlimited rides on the Enoden line for that day. Compare the pass price with your actual route before buying.
Kai’s tip: The mistake I see travelers make is treating Hokokuji as if it sits naturally on the same train route as the Hase and Enoshima stops. It does not. If Hokokuji is a must for your photos, decide in advance whether you will bus there from Kamakura Station or skip it to protect your sunset time on Enoshima.
For a deeper transport breakdown from Tokyo, use this guide alongside my Tokyo to Kamakura transport guide. If you are still deciding whether Kamakura deserves a full day, my Kamakura day trip from Tokyo itinerary will help you compare a classic sightseeing route with this more photo-focused route.
Suggested 1-Day Kamakura Photo Itinerary
If your goal is to match the best light at each location, this is the most practical order to follow. The schedule assumes a reasonably active day with light meals, short shooting windows, and minimal shopping time.
- Early morning: Kamakura Koko-mae Station — arrive early for the cleanest crossing shots before the heaviest crowds build.
- Morning: Kotoku-in Temple — the Great Buddha faces southeast, so morning light usually gives the face a cleaner, more even look.
- Late morning to midday: Hokokuji Temple — brighter overhead light helps the bamboo glow green instead of turning flat and dark.
- Mid-afternoon: Hasedera Temple — softer afternoon light works well for gardens, small Jizo statues, and the ocean viewpoint.
- Late afternoon to sunset: Enoshima Island — finish with golden-hour sea views and, on clear days, a chance of Mt. Fuji.
Travel time between stops: Allow more time than the map suggests. Train waits, temple ticket lines, bus timing, and walking between platforms can easily add friction. The full photo route can take most of the day, especially if you stop for lunch or wait for specific train shots.
Good to know: Local trains and temple entrances can be crowded on weekends and Japanese holidays. If you want a calmer day, go on a weekday and start early. If you want a shorter version, skip Hokokuji and keep the route on the Enoden side between Kamakura Koko-mae, Hase, and Enoshima.
Recommended Guided Option: Best If You Want Kamakura and Enoshima Without Transit Stress
If you want a low-stress day from Tokyo, the Tokyo: Kamakura & Enoshima Day Trip including Temple Tickets is the guided option I would compare first. It is not a specialist photography tour and it does not perfectly replace this five-spot DIY route, but it is a strong fit if you want Hasedera, Kotoku-in, Enoshima, and central Kamakura handled in one organized day.
Why I’d book this one
- It removes the hardest part of the day: Instead of managing local trains, bus timing, temple tickets, and the return to Tokyo yourself, you get a structured Kamakura and Enoshima route with transport arranged.
- It covers several of the most photogenic stops: The route usually includes Hasedera, Kotoku-in, Enoshima, Komachi Street, and Tsurugaoka Hachimangu. That gives you temples, gardens, street scenes, and coastal views in one day.
- Traveler reviews point to the right strengths: Recent reviewers repeatedly highlight the guides, transportation, organization, and the convenience of seeing many Kamakura and Enoshima highlights without planning every move alone.
Book it if: you are visiting from Tokyo, want a broad Kamakura and Enoshima day, and care more about smooth logistics than building a pure photographer’s route around Kamakura Koko-mae and Hokokuji.
Do not book it if: your non-negotiable shots are the Slam Dunk crossing at sunrise and the Hokokuji bamboo grove. For those two, the DIY itinerary gives you better control.
| Option | Best For | Route Control | Transport Stress | Price Check |
|---|---|---|---|---|
| DIY Photo Route | Photographers who want Koko-mae, Hokokuji, and sunset timing | Highest | Highest | Check train, bus, and temple costs yourself |
| Guided Kamakura & Enoshima Day Trip | First-time visitors who want an organized Tokyo day trip | Lower | Lower | Check current tour price and included tickets |
Top 5 Kamakura Photo Spots & The Best Time to Shoot
These five places give you the strongest visual range for a first Kamakura photography day. To get better results, plan around light and crowd flow instead of simply following the nearest-station order.
1. Kamakura Koko-mae Station: The “Slam Dunk” Crossing
Kamakura Koko-mae Station is one of the most famous Kamakura photo spots thanks to its oceanfront railway crossing and its connection to the anime Slam Dunk. The combination of the Enoden train, the road crossing, and the Pacific Ocean makes it one of the most recognizable scenes in the area.
- Best Time to Shoot: Early morning. Later in the day, the crossing can become crowded and harder to photograph safely.
- What makes it special: It is the strongest choice if you want an instantly recognizable Kamakura photo. For access details and current etiquette notes, see my guide to the Kamakura Slam Dunk location.
- Photo Tip: Compose before the train arrives. A telephoto lens can compress the train, crossing, and ocean, while a wider lens gives more context of the slope and seaside setting.
- Important safety note: Never step onto the tracks or block traffic. Follow posted signs, staff instructions, and any designated photo areas in use during your visit.
Kai’s tip: The crossing is not a studio backdrop; it is a working road and railway crossing in a local neighborhood. I always tell readers to get the frame, move on, and avoid copying anyone who steps into unsafe positions for a shot. The cleaner photo usually comes from patience and timing, not from standing closer to the tracks.
2. Kotoku-in Temple: The Great Buddha
Kotoku-in Temple is home to the Great Buddha of Kamakura, one of the city’s most iconic landmarks. For many first-time visitors, this is the essential temple photo in Kamakura.
- Best Time to Shoot: Morning. Because the statue faces southeast, morning light usually gives the face a more even exposure.
- Admission: Current official pricing lists adults at ¥300 and children aged 6–12 at ¥150, with a small extra fee to enter inside the statue. Confirm before visiting.
- What makes it special: It is the best Kamakura photo spot for a classic landmark image. The bronze statue has a powerful scale, but the open-air setting also makes it approachable for first-time photographers.
- Photo Tip: Use a normal zoom for clean documentary-style shots, then try a lower angle for a more dramatic composition. If crowds are heavy, frame tighter on the upper body and face instead of waiting for a perfectly empty foreground.
3. Hokokuji Temple: The Bamboo Forest
Hokokuji Temple offers a very different kind of photo experience from Kamakura’s coastal and landmark temple scenes. Its bamboo grove is compact, quiet when timed well, and visually strong for texture, symmetry, and upward compositions.
- Best Time to Shoot: Late morning to midday. This is when filtered light through the bamboo canopy can give the grove a brighter green tone.
- Admission: The bamboo garden is currently listed at ¥400 for high school students and older and ¥200 for elementary/junior high students. Matcha with a sweet is a separate ticket, currently listed at ¥600. Confirm the latest details before you go.
- Access: From Kamakura Station, take a local bus toward the Jomyoji area, then walk a few minutes. The bus is the part of the route you should plan most carefully.
- What makes it special: It is the best Kamakura photo spot for bamboo and a more enclosed, quiet atmosphere. For practical entry and tea details, see my guide to Hokokuji bamboo forest tickets and matcha fees.
- Photo Tip: Look straight up with a wide-angle lens for converging bamboo lines. For a calmer image, isolate one bamboo stalk at eye level and let the background blur.
4. Hasedera Temple: Gardens, Jizo, and Ocean Views
Hasedera Temple combines hillside gardens, seasonal flowers, small stone statues, and elevated coastal views. It is one of the most varied photo locations in Kamakura, especially if you want more than one style of image in a single stop.
- Best Time to Shoot: Mid-afternoon. The light is usually softer than midday, which helps with gardens, stone statues, and the observation area.
- Admission: Current official pricing lists adults at ¥400 and children aged 6–11 at ¥200. April to June has longer listed opening hours than the rest of the year, but seasonal crowd systems may apply.
- What makes it special: It is the best Kamakura photo spot for variety. You can shoot flowers, stone details, hillside paths, and wide coastal views without leaving the temple grounds.
- Photo Tip: Look for the small smiling Jizo statues around the grounds, then move to the upper area for a view toward the coast. A 50–85mm lens is useful for compressing the coastline and foreground temple elements.
If you are also interested in portrait-style photos around Kamakura’s temple streets and gardens, a Kamakura kimono or yukata rental can fit naturally into a slower afternoon route, especially around Hasedera’s garden paths and the nearby Hase street area.
5. Enoshima Island: Sunset & Mt. Fuji Views
Enoshima Island is the best place to finish a Kamakura photography day. It offers sea views, dramatic cliffs, sunset light, and the possibility of seeing Mt. Fuji on clear days.
- Best Time to Shoot: Late afternoon to golden hour. Arrive on the island with enough time to walk uphill or across to the western viewpoints before sunset.
- Access & Admission: The island itself is free to enter. The Sea Candle observation tower, Escar, caves, and certain set tickets are paid. Prices and ticket combinations changed in recent years, so check the current official ticket before buying.
- What makes it special: It is the strongest final stop if you want sunset photos and wide coastal scenery. Clearer, colder months usually give better odds for Mt. Fuji visibility.
- Photo Tip: Head toward the western side of the island or the Sea Candle area. A telephoto lens helps compress Mt. Fuji and the coastline. For sunset silhouettes, expose for the sky and let the foreground fall darker. If you are visiting Enoshima independently from Tokyo and want a convenient transport option, the Enoshima Sky View Ticket with Odakyu Line access may be worth comparing with separate tickets.
Kai’s tip: If I had one day, I would protect two photo windows above everything else: early morning at Kamakura Koko-mae and golden hour on Enoshima. The middle of the day is more flexible. If you fall behind schedule, shorten lunch or skip a secondary stop rather than arriving at Enoshima after the best light is gone.
What to Shoot on a Rainy Day in Kamakura
Rain can disrupt an outdoor photo plan, but Kamakura still offers worthwhile shots in wet weather. The trick is to stop chasing the “perfect” coastal sunset and switch to texture, reflections, covered angles, and indoor details.
- Hasedera’s Kannon Museum: A useful indoor fallback on the temple grounds, with separate paid admission and possible temporary closures.
- Hokokuji’s tea house: If open and tickets are available, the covered tea area lets you photograph the bamboo garden from a drier position.
- Komachi-dori near Kamakura Station: Good for street photography, food stalls, shop signs, umbrellas, and rainy-day atmosphere.
- Tsurugaoka Hachimangu: The approach, gates, and covered areas can still work with an umbrella, especially for wider shrine compositions.
- Enoshima aquarium area: A separate paid attraction near the Enoshima bridge, useful if the weather is too rough for cliffs and sunset views.
Kai’s tip: When I send friends to Kamakura on a wet forecast, I tell them to stop thinking of the day as a failed beach-and-sunset plan. Wet stone paths, umbrellas, temple greens, and shopfront reflections can look excellent. Just keep Enoshima cliffs as optional in strong wind or heavy rain, not as the centerpiece of the day.
If rain shortens your day, use a simpler route: Kamakura Station, Komachi-dori, Tsurugaoka Hachimangu, Hasedera, and Kotoku-in. For a shorter version of the city, compare this with my Kamakura half-day trip guide.
Essential Photography Rules & Etiquette in Kamakura
Kamakura is one of the most visited day-trip destinations near Tokyo. Many of its best photo spots are active religious sites, residential streets, working train crossings, or narrow walking paths. Better etiquette gives you better photos and keeps these places accessible for everyone.
- Do not use tripods where they block paths: Many temple grounds are narrow and crowded. Assume handheld shooting unless signage or staff clearly allows otherwise.
- Stay clear of railway tracks at Kamakura Koko-mae: Never step onto the tracks, block cars, or hold up pedestrians for a photo.
- Follow posted signs inside temples: Outdoor photography is often allowed, but some halls, museum spaces, sacred areas, and interiors may prohibit photos.
- Do not fly drones: Drones are not appropriate around crowded tourist areas, temples, railway lines, beaches with people, or residential streets.
- Move after taking the shot: At popular spots like the crossing, the Great Buddha, and Hasedera’s small-statue areas, take your photo and give the next person room.
Kai’s tip: What catches people out in Kamakura is how quickly a “quiet” lane becomes crowded. A small tripod, a long portrait session, or one group blocking the crossing can affect dozens of people behind them. The safest habit is simple: shoot, step aside, review your image somewhere else, then come back only if you need another frame.
Getting Around: DIY vs. Guided Tour
You can absolutely visit these Kamakura photo spots on your own. The question is whether you want maximum photo control or minimum logistics. The DIY route is best for photographers. A guided tour is best for first-time visitors who want an efficient overview from Tokyo without managing every transfer.
| Factor | DIY Photo Route | Guided Kamakura & Enoshima Day Trip |
|---|---|---|
| Best For | Travelers who want Koko-mae, Hokokuji, and sunset timing under their own control | Travelers who want an organized Tokyo day trip with major Kamakura and Enoshima highlights |
| Time Efficiency | Depends on your route planning and train/bus timing | Usually easier because transport and the broad route are pre-arranged |
| Photo Control | Highest—you can wait for the train, light, or fewer people | Lower—you follow the group’s timing at each stop |
| Temple Tickets | You buy separately at each site | Check the booking page to confirm which tickets are included on your date |
| Cost | Usually cheaper, but you handle all tickets and transport yourself | Usually higher, but more convenient and organized |
Who is DIY best for? Choose DIY if your main goal is photography and your must-have shots are the Kamakura Koko-mae crossing, Hokokuji bamboo, and Enoshima sunset. DIY gives you the control to wait, adjust, skip, and stay longer.
Who should book a tour? Choose a guided trip if your priority is seeing Kamakura and Enoshima smoothly from Tokyo, not building a perfect photographer’s schedule. The Tokyo: Kamakura & Enoshima Day Trip including Temple Tickets is the one I would check first because it focuses on the core first-time visitor corridor: central Kamakura, Hasedera, Kotoku-in, and Enoshima.
Final Recommendation: Which Kamakura Photo Plan Is Right for You?
If this is your first time in Kamakura and you are comfortable with local trains and buses, I would choose the DIY route for the most photography control. Start early at Kamakura Koko-mae, keep Hokokuji as your deliberate bus detour, and protect the Enoshima sunset window.
If this is your first Japan trip, you are visiting from Tokyo, or you are traveling with family, the guided option is worth serious consideration. You will trade away some photo freedom, but you also remove the most tiring parts of the day: transfers, ticket decisions, and route management.
Choose the DIY route if…
- You want full control over your shooting schedule and timing.
- You care strongly about the early Kamakura Koko-mae crossing shot.
- You want to include Hokokuji’s bamboo grove.
- You are comfortable using local trains, buses, and IC cards.
- You are on a tighter budget and do not mind organizing the day yourself.
Choose the guided day trip if…
- Your main priority is reducing transit stress from Tokyo.
- You want Hasedera, Kotoku-in, Enoshima, and central Kamakura in one organized day.
- You prefer to have a guide, meeting point, and broad route handled for you.
- You are visiting on a weekend or holiday and want fewer decisions to manage.
- You are okay with a sightseeing-focused day rather than a pure photo-timing itinerary.
My practical pick
For photographers, I would go DIY. For first-time visitors who want Kamakura and Enoshima without building the whole route themselves, I would compare dates and inclusions for the Tokyo: Kamakura & Enoshima Day Trip including Temple Tickets. The most important thing is to choose the plan that fits your real priority: perfect timing, or an easier day.
Frequently Asked Questions
What is the most famous photo spot in Kamakura?
The most famous photo spot for many visitors is Kamakura Koko-mae Station, especially the railway crossing with the Enoden train and ocean behind it. For temple photography, the most iconic landmark is the Great Buddha at Kotoku-in.
What time should I go to Kamakura Koko-mae Station for photos?
Go early in the morning if you want the cleanest frame. The crossing becomes much harder to photograph later in the day because of crowds, road traffic, and safety controls.
Can I see Mt. Fuji from Kamakura?
Yes, on clear days you may be able to see Mt. Fuji from coastal areas around Kamakura and Enoshima. Visibility is often better in colder months, and sunset from Enoshima is one of the best chances for a sea-and-Fuji composition.
How much time should I spend at each photo spot?
As a rough planning guide, allow a short stop at Kamakura Koko-mae, 20–30 minutes at Kotoku-in, 30–60 minutes at Hokokuji depending on matcha, 45–60 minutes at Hasedera, and at least 1.5 hours for Enoshima if you want sunset. Add buffer time for trains, buses, tickets, and walking.
What camera lens should I bring to Kamakura?
A 24–70mm equivalent zoom is the most useful single lens for Kamakura. A 70–200mm equivalent helps with the Enoden crossing and Mt. Fuji compression. A 16–24mm equivalent is useful for Hokokuji’s bamboo grove and tight temple spaces.
What is the best season for photography in Kamakura?
Autumn is excellent for clear air and foliage, spring brings cherry blossoms, early summer is famous for hydrangeas, and winter gives some of the clearest Mt. Fuji views from Enoshima. Each season works, but winter and autumn are usually easier for coastal visibility.
Are tripods allowed at Kamakura temples?
Do not assume tripods are allowed. Many temple paths are narrow, crowded, or restricted, and staff may ask visitors not to use tripods or monopods. Handheld shooting is the safest default.
Is a guided tour worth it for Kamakura photography?
A guided tour is worth it if you want an organized Kamakura and Enoshima day from Tokyo with less transit stress. It is less ideal if your priority is waiting for exact light at Kamakura Koko-mae, Hokokuji, or Enoshima sunset.
Hi, I’m Kai. I’m a Tokyo-based travel writer, tourism industry insider, and the author of a published guidebook for international visitors to Japan. With over 10 years of professional experience at a leading Japanese tourism company, my mission is to help you skip the tourist traps and navigate Japan’s best destinations like a local. I believe the perfect day trip is like a traditional kaiseki meal: a beautiful balance of precise planning and unforgettable seasonal discovery. When I’m not out conducting field research, you’ll usually find me drafting new itineraries with one of my favorite fountain pens!