
Mt. Katsuudake, also written as Mt. Katsuu, is a 452 m limestone peak rising directly above Nago City in northern Okinawa. The walk from the trailhead car park to the summit is usually quoted at 30–40 minutes one way, and that figure is broadly accurate. It is also the most misleading thing about this mountain.
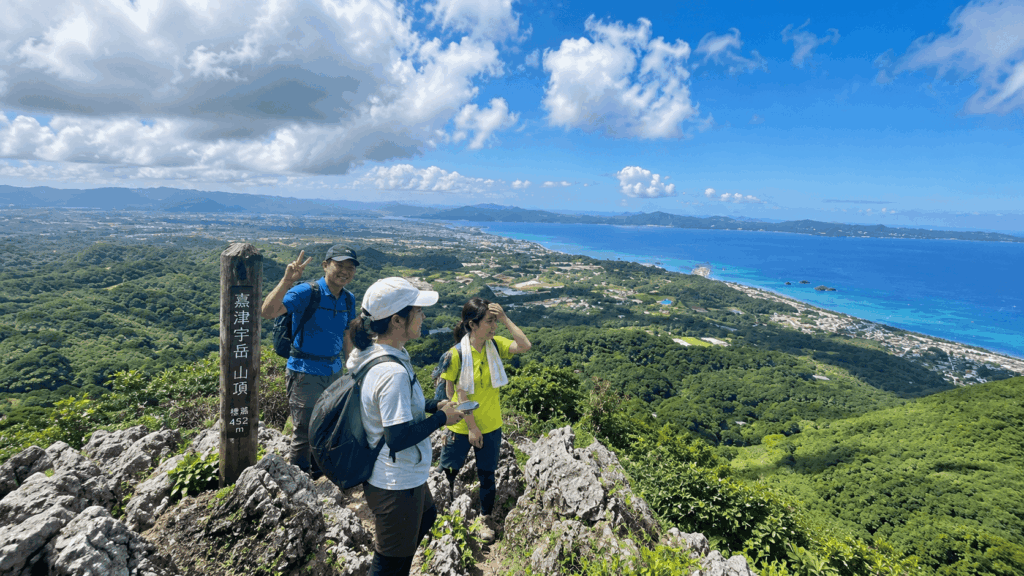
The trail is short. The upper half is not easy. Above the forest, the path turns into sharp, exposed Ryukyu limestone that demands careful foot placement, and the descent takes longer than most first-timers expect. Travelers who arrive in sandals, or who plan the hike around a fixed lunch booking, tend to be the ones who turn around halfway.
This guide is built around one question: should you hike it, given your shoes, your companions, and the weather on the day? The answer below is conditional, because the mountain is.
If you want to reach the summit but would rather have a guide help with the rocky sections, a private guided hike is worth comparing with going alone. Check available dates, language options, and pickup details for the Katsuu-dake guided hike before deciding which approach suits your trip.
The Short Answer
Mt. Katsuudake is worth hiking if you want a big ocean-and-mountain panorama and you are comfortable on steep, uneven rock. It is not worth forcing if the limestone is wet, if you are carrying a baby, or if your footwear was chosen for a beach day.
Best for:
- Active travelers with a spare half-day in northern Okinawa
- Hikers who have walked on rocky trails before and don’t mind using their hands
- Anyone chasing a panoramic view of Nago Bay and the Motobu Peninsula
- Photographers willing to trade a comfortable walk for a dramatic summit
Not ideal for:
- Travelers in sandals, slides, or smooth-soled fashion sneakers
- Anyone uneasy on exposed rock or steep steps without a handrail
- Families carrying infants or toddlers in a carrier
- Hikers planning to go up after heavy rain, or late enough that the descent runs into dusk
Mt. Katsuudake at a Glance
| Detail | What to Know |
|---|---|
| Location | Nago City, northern Okinawa (Katsuyama area) |
| Elevation | 452 m (about 1,483 ft) |
| Typical ascent | 30–40 minutes one way, as commonly quoted by local tourism sources |
| Recommended total time | 2–3 hours from the car park, including photo stops and a careful descent |
| Trail type | Forest steps and packed dirt, then steep, uneven limestone; hands needed in places |
| Entrance fee | Free |
| Parking | Free; a large lot, partly unpaved, with a step at the entrance |
| Best conditions | Dry weather, full daylight, grippy shoes, no fixed appointment afterwards |
| Main challenge | Footing on sharp, sometimes polished limestone, especially on the way down |
If you are still working out how to get around northern Okinawa, it is worth settling your transport before you build the hike into a day plan; the trailhead is not somewhere you want to improvise your way back from.
How Difficult Is the Mt. Katsuudake Hike?
Short and easy are two different measurements, and this is the mountain where that distinction matters most. The horizontal distance is modest. Course data from a September 2026 hike put the round trip at roughly 2 km with about 277 m of cumulative climbing, while other route records vary between roughly 1.3 km and 2 km depending on the line taken. None of that sounds demanding.
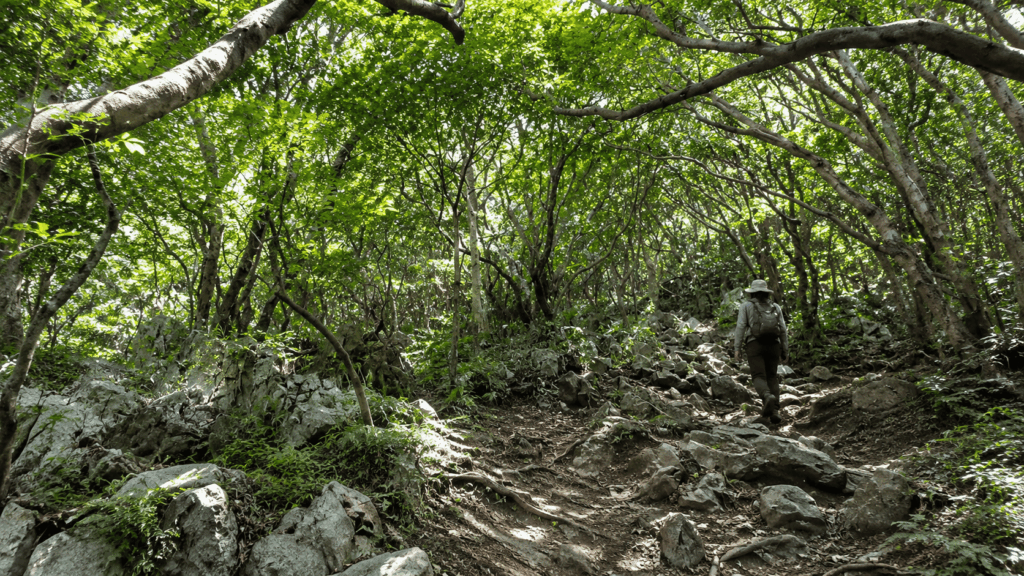
What the numbers don’t capture is the surface. Above the forest section, the trail becomes a jumble of sharp limestone blocks and worn, rounded edges. Some sections are steep enough that you will want your hands free. In wet conditions the same rock becomes genuinely slippery, which is the hazard travelers mention most often in post-hike reports.
Why a Short Hike Doesn’t Mean an Easy Trail
Most guides quote the ascent time and stop there. That is where the planning goes wrong. The ascent is the part where you are fresh and looking up; the descent is where tired legs, downhill momentum, and sharp rock combine.
A September 2026 trail record is a useful reality check: the hiker left the car park at 07:35, reached the summit at 08:26 (about 51 minutes), and was back at the car by 09:56, roughly two hours and twenty minutes in total. That is a careful pace, not a slow one, and it sits well outside the “”30 minutes”” headline. Read the 30–40 minute figure as the time a fit, unencumbered walker needs on a dry day, not as the time your visit will take.
The mistake I see first-time visitors make is budgeting the hike around the ascent and then discovering the descent is the part that needs attention. Give yourself the full two to three hours and the mountain becomes enjoyable rather than rushed.
Who Should Hike It — and Who Shouldn’t
The honest answer depends on the person, not on the mountain. What I notice in trip reports is that the people who struggle here are rarely unfit; they are usually competent walkers on the wrong surface. Use the table below as a filter rather than a promise, because conditions on the day can override any of it.
| Traveler Type | Recommendation | Why | Key Precaution |
|---|---|---|---|
| Reasonably fit beginner with proper shoes | Yes, with caution | The distance is short enough for most adults who walk regularly. | Wear grippy shoes and allow 2–3 hours, not 1. |
| Experienced hiker | Yes | Short but technically engaging; a good half-day filler between coastal stops. | Don’t let the short distance tempt you into rushing the descent. |
| Family with primary-school children who already hike | Yes, if conditions are dry | Local guided tours accept children from primary-school age, which gives a rough sense of the expectation. | Keep hands free, and put one adult per child on the rock section. |
| Family carrying an infant or toddler | Not recommended | You need both hands on the upper rocks, and a carrier changes your balance. | One adult can wait at the trailhead; the forest lower section is still a pleasant walk. |
| Traveler with limited balance or mobility | Reconsider | Uneven, sharp, and sometimes polished rock with few flat resting spots. | Turn back at the first steep section rather than pushing to the summit. |
| Traveler wearing sandals or slides | No | Open toes against sharp rock, and almost no grip on wet limestone. | Closed shoes at minimum; trail shoes or hiking shoes are better. |
| Hiker after heavy rain | Skip, or wait a day | Wet limestone is the single most common hazard described by visitors. | Let the rock dry out before you go up. |
What the Mt. Katsuudake Trail Is Actually Like
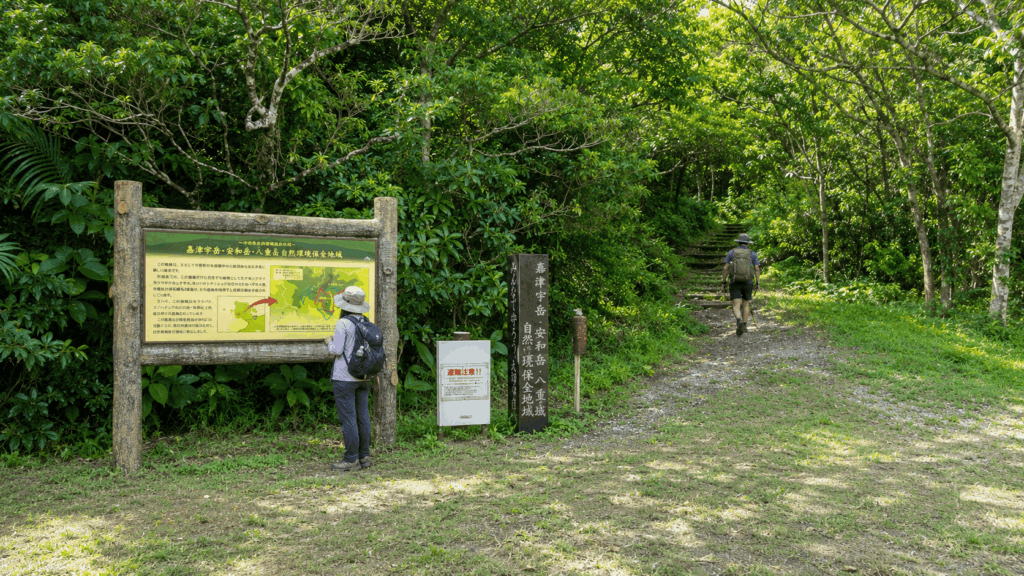
The route starts at the back of the car park, past a trailhead sign, and almost immediately makes you doubt the warnings. This is the part that produces so many “”it was easier than expected”” reports, and it is real, for about the first third.
The First Section: Steps and Subtropical Forest
From the trailhead you climb on steps and packed earth under dense subtropical forest. Ferns crowd the edges of the path, the canopy holds the heat in, and the light comes through in patches rather than full sun. Route markers, red ribbons tied to branches and painted marks on stone, appear at intervals, and there is usually a clear worn line to follow.
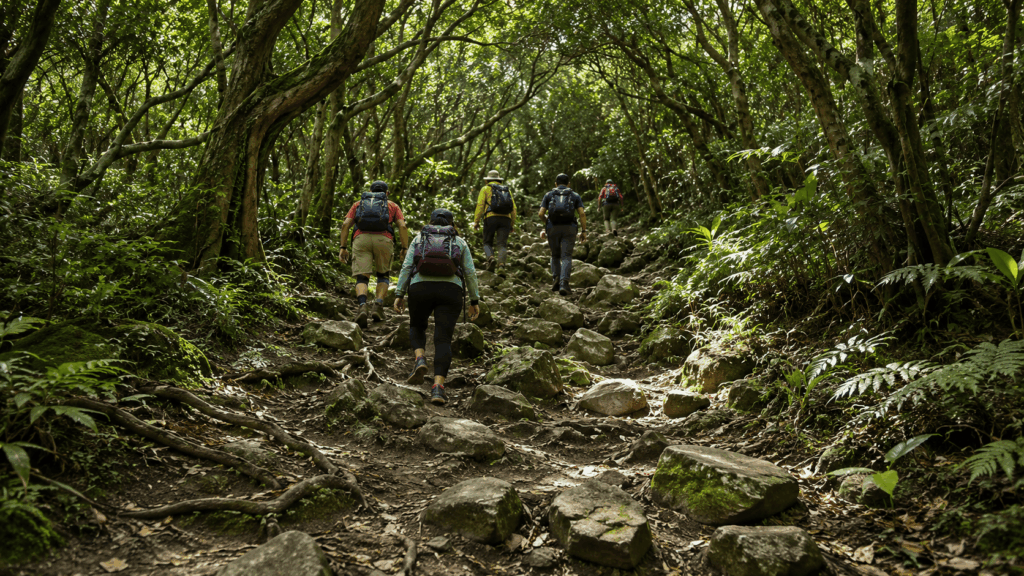
This section is genuinely walkable in ordinary trainers. It also lulls people into the wrong frame of mind. The forest is the approach, not the hike, and judging the mountain by the first ten minutes is the most common misjudgment on this trail.
One practical note: the markers exist because people have lost the line here before, and local reports have flagged that some older markers have deteriorated. Keep the next marker in sight rather than assuming the path is obvious, especially where side trails branch toward the neighboring peaks.
The Limestone Scramble
Where the forest thins, the character changes completely. The path turns into exposed Ryukyu limestone: jagged blocks, narrow ledges, and short steps up that are easier with a hand on the rock. One 2026 account singled out the final stretch below the summit, roughly 80 m of elevation gain, as the hardest part of the route. That is one hiker’s assessment rather than a fixed technical grade, but it matches the general pattern of reports.
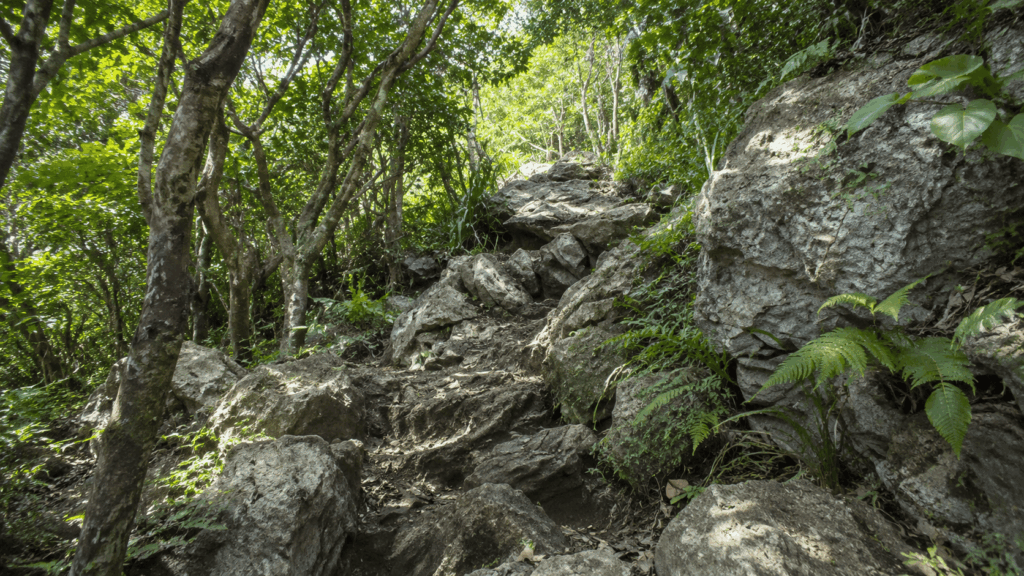
This is where shoes stop being a detail. Smooth-soled sneakers skate on the rounded surfaces; sandals leave your toes exposed to edges that are genuinely sharp. Gloves are not essential, but they make the hand-plants more comfortable if you plan to use the rock for balance.
There is no shame in turning back here. The view opens up well before the summit, and the section you have already walked is worth the effort on its own.
The Summit Rocks and the Descent
The summit is not a flat clearing with a bench. It is a cluster of rock with a marker, a few usable standing spots, and very little level ground, a detail confirmed in recent trail photography and repeated in visitor accounts. The best viewpoints sit near the edges, which means the last meter of any photo involves a decision about how close you actually need to stand.
Coming down is the part that surprises people. Downhill momentum on rounded limestone is harder to control than the climb, and the sharp edges are suddenly at shin height rather than in front of you. Take the descent at conversation pace, keep your hands available on the steep section, and resist the urge to make up time.
The full route is short enough that a careful descent costs you twenty extra minutes. Rushing it costs considerably more.
What to Wear and Bring
Packing for Mt. Katsuudake is less about gear and more about one decision: what is on your feet. Everything else is secondary, and most of it you probably already have in your bag.
Shoes, Gloves, and Long Pants
Wear closed shoes with a real tread. Trail runners, hiking shoes, or any walking shoe with a lugged sole will do; smooth-soled fashion sneakers and beach sandals will not. The limestone is sharp enough to catch exposed toes and polished enough in places that grip matters more than cushioning.
Long pants are worth the heat. The path passes through dense vegetation, and the rock edges sit at exactly the height where bare shins get scraped. Lightweight hiking trousers or even comfortable outdoor trousers are enough. This is not a case for technical mountaineering gear.
Gloves are optional but genuinely useful. A cheap pair of gardening gloves or lightweight work gloves lets you put a hand down on rough rock without thinking about it. The guided tours in the area ask participants to bring gloves, which tells you something about how much hand contact to expect.
Kai’s tip: The shoes are where most people cut corners, and it is almost always because the hike was added to a beach day at the last minute. If you only change one thing before setting off, change your footwear. A pair of trainers with grip turns the upper section from a negotiation into a walk.
Water, Sun, and Weather Protection
There are no vending machines at the trailhead, and none on the mountain. Buy water before you leave Nago. Even in cooler months the humidity makes the climb sweatier than the distance suggests, and the forest section blocks any breeze until you reach the ridge.
- Essential: grippy closed shoes, at least one liter of water per person, a charged phone
- Strongly recommended: long pants, lightweight gloves, sun protection, insect repellent
- Depends on conditions: a light outer layer for the windy summit, a compact rain jacket, an offline map or downloaded trail map
Two small things worth knowing. First, older reports mention wooden walking sticks left at the trailhead for hikers to borrow; treat that as a bonus rather than a plan, since there is no guarantee any are there when you arrive. Second, a stick is a balance aid, not snake protection. It does not make it safe to push through undergrowth or reach into rock gaps.
When to Hike — and When to Skip It
The local tourism association recommends hiking in daylight hours, and that is the single most useful piece of advice on this page. The mountain is short, but the descent is slow, and the last thing you want on sharp limestone is fading light.
Dry Weather Matters More Than the Season
There is no bad season for this hike, but there is a bad surface condition. The trail drains reasonably well, yet the limestone holds moisture in shaded sections and on the rounded slabs. Travelers consistently describe the rock as slippery after rain, and it is the descent where that matters, because you are committing weight downhill onto surfaces you cannot fully see.
Okinawa’s rainy season usually falls around May to mid-June, and typhoon season broadly spans July to September, so late spring and late summer carry more risk of a washed-out plan. Outside those windows the main variables are heat and humidity rather than rain. An early start solves both: cooler air, softer light, and a large buffer before sunset.
Do not treat a forecast of “”cloudy with showers”” as automatically disqualifying. A cloudy day can actually be more comfortable here, and the view does not require blue sky, though low cloud sitting on the summit will remove the reason you came.
When to Turn Back
Turning around is a normal outcome on this trail, not a failure. The forest section is pleasant on its own, and the view starts opening before the summit.
| Go if… | Reconsider if… |
|---|---|
| The rock has had at least a day to dry | It rained heavily last night or is raining now |
| You have several hours of daylight left | You are starting within two hours of sunset |
| Everyone in the group has closed shoes with grip | Someone is in sandals or smooth-soled shoes |
| You are prepared to turn back at the steep section | Someone is already fatigued, dehydrated, or uneasy on rock |
Kai’s tip: The riskiest window is not during the rain. It is the morning after. The forest floor looks dry, the sky is clear, and the shaded limestone is still holding water. If a heavy downpour passed through the previous afternoon, shift the hike a day later rather than treating sunrise as proof the trail has recovered.
If the weather closes in, northern Okinawa has enough indoor and coastal options to fill the slot; the mountain will still be there tomorrow.
Is the Summit View Worth the Climb?
Yes, with the usual caveat that you are buying a view, not a viewing platform. On a clear day the summit delivers one of the better panorama-to-effort ratios in northern Okinawa.
What You Actually See
The summit looks west and north over Nago Bay and the Nago city area, with the green ridges of the Motobu Peninsula and the Yaedake range filling the horizon. Local tourism material describes a 360-degree panorama, and on a clear day that is a fair description, with the honest qualification that haze, cloud, and your exact standing position all change what you get.
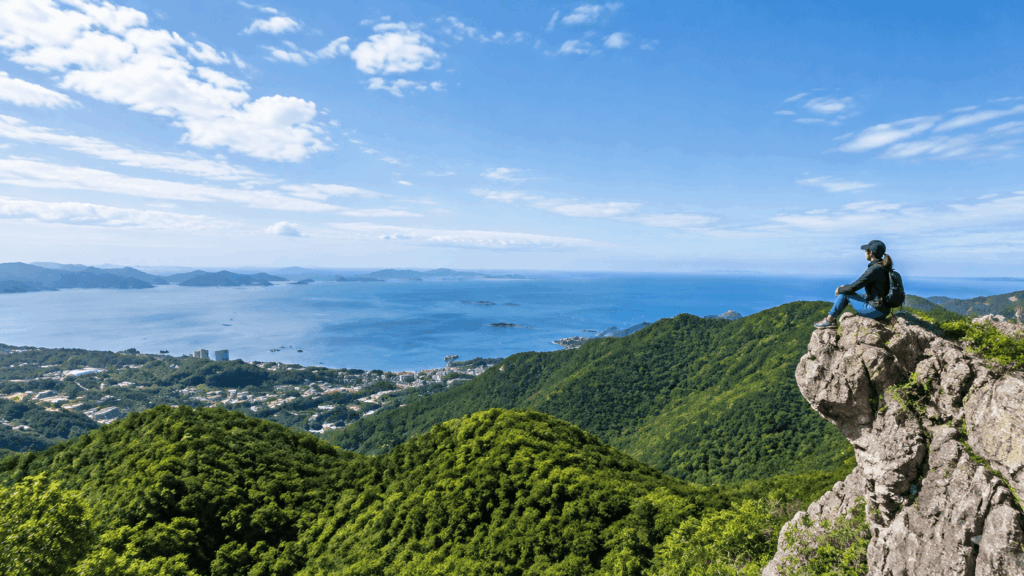
What makes the view distinctive is the combination: ocean, city, and forested ridges in a single frame, from a peak that is only 452 m high. You are not above the clouds here. You are close enough to the coast that the water reads as water, not as a distant blue band.
What the Top Is Like
Expect rock, not a lawn. The summit is a cluster of limestone blocks with a marker and a handful of stable standing spots; flat ground is scarce. Recent trail photography makes the point clearly. This is a place where you find a safe position and stay in it, rather than wandering for the perfect angle.
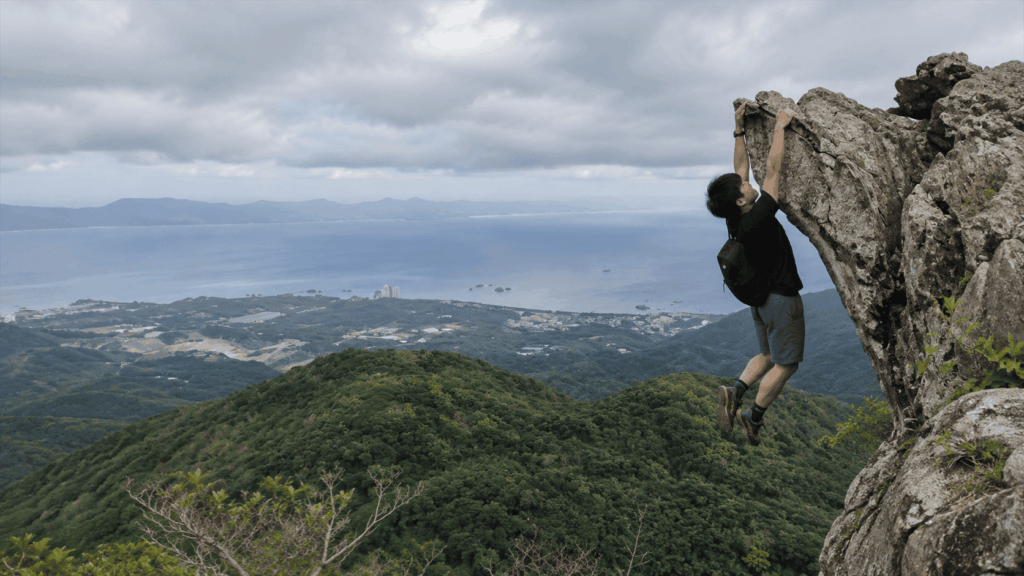
It can also get busy. Midday on a weekend is the least peaceful window, and the most photogenic edges are exactly where people cluster. Going early does not guarantee solitude, but it noticeably improves your odds. If the summit is already crowded when you arrive, the north-facing rocks a few steps back give you the same view without queueing at the edge.
Standing back from the edge costs you nothing in the photograph and removes the main risk of the day.
How to Get to Mt. Katsuudake and Where to Park
Reaching the trailhead is the part of this trip that catches overseas visitors off guard. The drive is not long, but the last stretch is narrow, and the car park is not always where your navigation app thinks it is.
Driving to the Trailhead
From Nago, head north on National Route 58 and follow signs toward the Motobu Peninsula, joining National Route 449. The trailhead sign appears a short distance past the point where the two routes converge, and from there you follow a series of signs up through the Katsuyama area. The approach road is paved but narrows in places, with sections steep enough that you will want to keep your speed low and your attention up.
Navigation is the weak link. At least one recent visitor reported that the car park did not appear clearly on their satnav and that they found the turn by following a printed trail map toward the Katsuyama BASE CAMP area. If your app looks confused, aim for the trailhead sign and the BASE CAMP rather than typing the summit name, which will point you at a location on the mountain rather than a road.
Kai’s tip: The last few hundred meters are the real test of the drive, not the highway. The road narrows, the gradient steepens, and the car park entrance has a lip you will feel if you are in a large vehicle or a low-slung car. Take it at an angle and at walking pace. Most rental car damage on this kind of access road happens in the final minute, not on the open road.
Parking, Toilets, and Facilities
Parking is free and the lot is large, though the surface is a mix of dirt and paving rather than a smooth sealed area. There is a step at the entrance, and the unpaved sections can be muddy after rain. Toilets are available at the car park, basic trailhead-standard facilities rather than anything more polished, and there is no vending machine, shop, or water source.
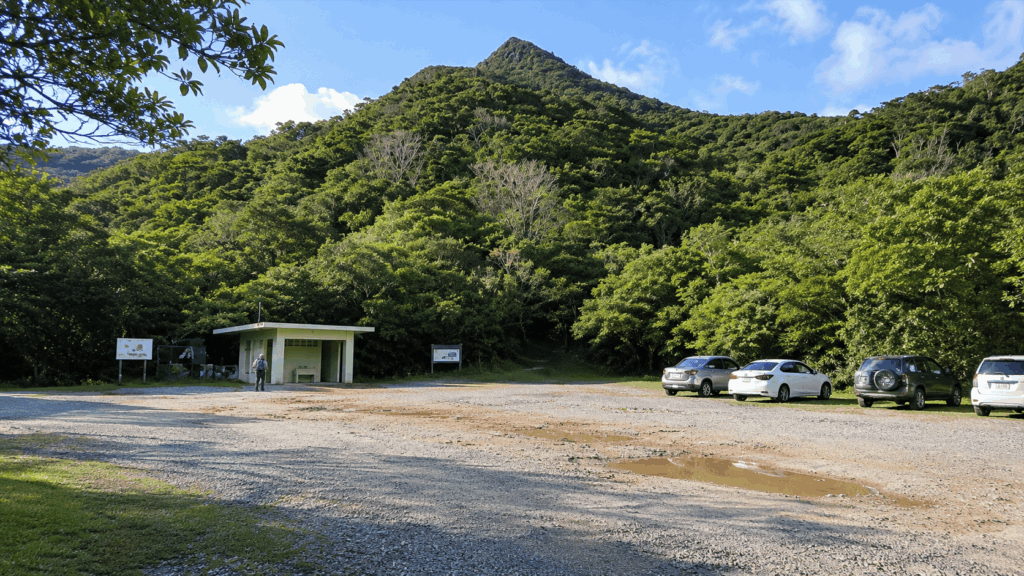
Facilities in places like this change with maintenance schedules and seasons, so treat “”toilets available”” as the expectation rather than a guarantee, and carry water regardless.
Can You Visit Without a Car?
In practice, no, not comfortably. The nearest bus stop, Katsuyama Iriguchi, sits roughly 2 km below the trailhead on a climbing road with no proper walking shoulder, which turns a short ride into an unappealing road walk before you have even started the hike. Taxis can work, but you will need to arrange the return trip in advance, because there is nothing at the trailhead to hail.
For most travelers, this is a rental car day. If you are planning several stops across northern Okinawa, it is worth comparing rental options for your dates before you lock in an itinerary, since availability tightens around holidays.
Self-Guided or Guided?
Both are legitimate. The question is whether you want company and local judgment on the rock, or whether you would rather move at your own pace and keep the cost at zero.
| Factor | Self-Guided | Guided |
|---|---|---|
| Cost | Free (parking is free too) | From about ¥6,000 per person for two or more; around ¥7,000 for a solo booking |
| Flexibility | Start when you like, leave when you like | Fixed meeting time and a set route |
| Route support | You follow the markers yourself | Someone else reads the trail and sets the pace |
| Equipment preparation | Entirely on you | Gear requirements are specified in advance |
| Language support | Not applicable | Confirm English support directly; it is not stated on the operator’s page |
| Weather decisions | You judge the conditions | The operator decides; heavy rain cancels, light rain usually proceeds |
| Best for | Confident hikers with proper shoes and a free half-day | First-timers on rocky terrain, or anyone who wants the route handled |
Self-Guided: Best for Confident Hikers
Go self-guided if you have walked on rocky trails before, you can read a trail marker, and you are willing to abandon the summit if the rock is wet. The route is short enough that navigation is rarely the problem; judgment on the descent is. Bring the right shoes and the decision stays simple.
Guided: When the Extra Support Helps
Katsuyama BASE CAMP runs a guided walk of Mt. Katsuudake, quoted at roughly three hours round trip, with participants from primary-school age upward. Long sleeves, long pants, and gloves are requested, and you bring your own drink, pack, and rain gear. Heavy rain cancels; light rain usually goes ahead.
Two honest caveats. A guide reduces uncertainty but does not remove the rock. You are still walking on the same limestone. And the operator’s page does not state whether the guiding is conducted in English, so if that matters to you, ask before booking rather than assuming.
If the rock is your main worry, this is a reasonable middle path rather than a necessary upgrade.
For travelers who want to tackle the limestone scramble but prefer English-language guidance, a separate GetYourGuide-listed Katsuu-dake hike is worth considering. Unlike a general sightseeing tour of northern Okinawa, this experience focuses on the mountain itself.
Why I’d book this one
- Guidance on the actual mountain: The itinerary covers Mt. Katsuu and its rocky terrain, making it relevant to the route-finding and footing concerns described above.
- English-language support: English and Japanese guiding options are listed, which is useful if you want to understand instructions and discuss the route rather than relying entirely on trail markers.
- A defined half-day experience: The private guided hike is listed at roughly three hours, with pickup options and booking conditions to review before committing to a date.
This is a newer listing with limited published traveler feedback, so there is not yet a dependable review trend to summarize. A guide can help with route decisions and pacing, but cannot make wet limestone safe or replace suitable footwear.
See live availability, starting times, language options, and current booking conditions for the Katsuu-dake guided hike to decide whether the added support is worth it for your trip.
A Simple Half-Day Plan
The best version of this hike is short, early, and paired with something local afterwards. You do not need a tightly scheduled itinerary, just enough structure to avoid rushing the descent.
Start Early and Allow Time for the Descent
- Check the weather and the overnight rainfall before leaving Nago.
- Drive up to the trailhead and park, allowing a few extra minutes for the narrow final stretch.
- Walk up at a sustainable pace, stopping where the view opens rather than saving everything for the top.
- Spend fifteen to twenty minutes at the summit, staying back from the edges.
- Descend deliberately, keeping your hands available on the steep section.
Budget two to three hours from car park to car park. That is not padding. It is the difference between a hike you enjoyed and one you endured.
Stop at Katsuyama Shikuwasa After Your Hike
The Katsuyama Shikuwasa shop sits in the same district, which makes it an easy add-on rather than a detour. It sells juice and processed products made from locally grown shikuwasa, the small sour citrus that gives Okinawan cooking much of its edge.
Practical details: the shop is listed at 9:00–17:00 at Katsuyama 9, Nago, with a phone number of 0980-53-8686. Published closing days vary between sources, with some listing it as open daily apart from New Year and others listing Sunday and Obon closures, so call ahead or check the official site before you build your afternoon around it. Some listings also mention cash-only payment, and tasting is not something to count on as a guaranteed service.
If the shop is closed, the hike still stands on its own. Treat the stop as a bonus rather than the point of the trip.
From there, the rest of northern Okinawa is open to you: Nago’s coastline, the Motobu Peninsula, or an early dinner back in town. If you are building a longer itinerary, check out our guide to the best hikes in Okinawa for more trail ideas.
Mt. Katsuudake Hiking FAQs
How long does it take to hike Mt. Katsuudake?
Most published guides quote 30–40 minutes one way, and fit walkers on a dry day do hit that. Plan for two to three hours in total, including photo stops and a cautious descent. A September 2026 trail record logged about 51 minutes up and two hours twenty minutes for the full round trip.
Can beginners hike Mt. Katsuudake?
Beginners can hike it, but “”beginner-friendly”” deserves a qualifier. The distance is short and the lower forest section is straightforward. The upper limestone requires hands, balance, and careful foot placement. If you walk regularly, wear shoes with grip, and accept that you may turn back below the summit, it is within reach.
Is Mt. Katsuudake safe after rain?
It is the condition to take most seriously. Wet limestone becomes slippery, particularly on the descent, and travelers repeatedly describe the rock as hazardous after rainfall. A light shower is manageable with good shoes; heavy rain or a soaking the previous afternoon is a reason to postpone by a day rather than test your luck.
Can you hike Mt. Katsuudake with kids?
Children who already hike can manage it, and the local guided tour accepts participants from primary-school age. Keep hands free, assign one adult per child on the rock section, and choose a dry day. Carrying an infant or toddler is not advisable, since the upper trail needs both hands and a carrier changes your balance.
Is parking free at Mt. Katsuudake?
Yes. The trailhead car park is free, and there is no entrance fee for the mountain. The lot is large but partly unpaved, with a step at the entrance, and it can be muddy after rain. Toilets are available there, but there are no vending machines, so bring water from Nago.
Final Verdict: Who Should Hike Mt. Katsuudake?
This is a good mountain with a reputation problem, not because it is overrated but because it is sold as something easier than it is. Decide by traveler type rather than by summit photos.
For first-time visitors to Okinawa
Hike it if this is your only chance to see the island from above and you have a dry half-day in the north. The combination of Nago Bay, the city, and the Motobu Peninsula ridges in one frame is hard to match for the effort. Skip it if your itinerary is built around beaches and you only packed sandals. The mountain will not forgive the footwear, and there is no shortcut to the view.
For families with children
Choose this if your children have walked rocky trails before and the forecast is dry. Turn back at the steep section without treating it as a defeat; the forest walk below is a legitimate outing on its own. If you are carrying a child, plan for one adult to stay at the car park, with the Katsuyama Shikuwasa stop as the reward instead.
For travelers on a tight schedule
Two to three hours is the realistic block, and that only works if you are driving. Without a car, the bus stop sits about 2 km below the trailhead on a climbing road, which turns a short hike into a long day. If you have a fixed lunch reservation in Nago, either start early or save Mt. Katsuudake for a trip with more slack.
For repeat visitors and confident hikers
This is an excellent short objective when you have already done the coastal circuit. Go early, take the descent seriously, and pair it with the shikuwasa shop and a drive around the Motobu Peninsula. If you want the route handled and the pace set for you, the guided walk from Katsuyama BASE CAMP is a reasonable alternative; just confirm the language situation before booking.
What I would tell a friend planning their first visit is simple: this is not a walk you squeeze in before checkout. Give it a morning, wear the shoes you would wear on a wet hiking trail rather than the ones you wore on the plane, and leave the summit if the rock is slick. Do that, and the view earns its reputation.

Hi, I’m Kai. I’m a Tokyo-based travel writer, tourism industry insider, and the author of a published guidebook for international visitors to Japan. With over 10 years of professional experience at a leading Japanese tourism company, my mission is to help you skip the tourist traps and navigate Japan’s best destinations like a local. I believe the perfect day trip is like a traditional kaiseki meal: a beautiful balance of precise planning and unforgettable seasonal discovery. When I’m not out conducting field research, you’ll usually find me drafting new itineraries with one of my favorite fountain pens!